Wednesday, October 31, 2012

Happy Halloween - Celebrate Your Day

A late Halloween Hello to you my Crafty Friends!

**So Honored that This cutie was chosen as The Shabby Tea Room Winner 11/5/12 Thank you so much ladies for liking my card I am honored!**


Alas, Sandy you interrupted my crafting program this week once again! I love to join in The Shabby Tea Room, and do to our unwanted visitor, I just didn't get a chance to do that. So I found some crafty time this morning, and feel blessed to be able to do so. My heart goes out to those that are affected by this terrible storm. 

So I have one last Halloween card to share with you!

Here is my card based on the Inspiration photo.  We are asked to use the colors of the photo and a flower.
I used Emma from Paper Sweeties with her coordinating paper pieced outfit from You Are Special which has been embellished with a flower a cue taken from the inspiration photo. 
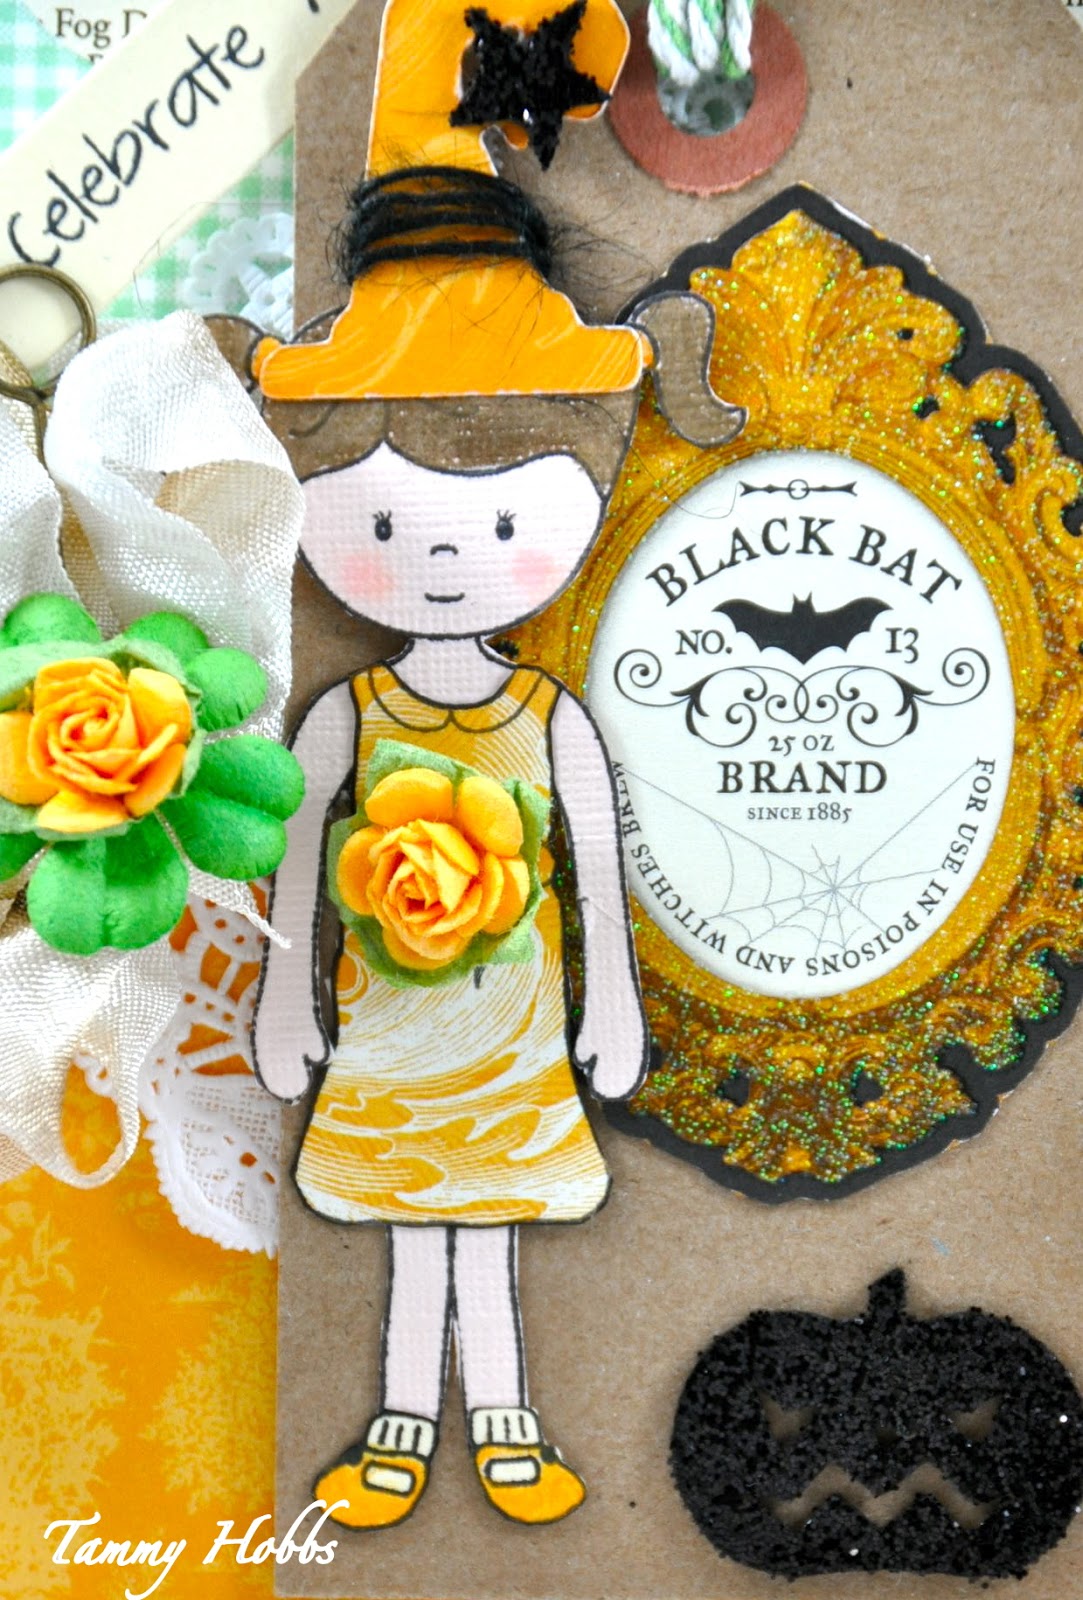
Her silly Witches Hat, I improvised using my Mini Monsters Cricut Cartridge. Another cue taken from the inspiration photograph.  I added a black embellished star and wrapped some May Arts twine around her hat for some visual interest and texture. To the bottom right of the tag, a foam glittered pumpkin was added. .

A sentiment from Paper Sweeties You Make Me Smile sentiment set was stamped and hand-cut in a banner and placed in a memory pin and tucked inside the shabby seam binding bow which has been embellished with a prima flower. 

Here is the precious Inspiration photo! Maybe now you can understand why I couldn't resist!
I am also entering this into Cupcake Craft Challenge: Witches & Pumpkins
My Craft Spot: Too Cute To Spook
Twisted Tuesday - Free For All

Thanks for popping by my blog today! We wish you a Happy and Safe Halloween with Family and Friends!
Hugs and Blessings!
~Tammy~

Home Decor Tutorial with The Kraft Journal

 Hi Everyone,

I have a little home decor tutorial for you today for The Kraft Journal using The Kraft Outlet Vintage Dictionary Pages to cover craft store pumpkins. I first saw these in a store in Williamsburg, Virginia this summer in a gift shop going for $14.00 to $25.00 depending on the size. 

You may have seen these before, but I wasn't willing to spend that much money on something I had the resources to make myself. 

First let's gather some supplies:
* Craft Store Pumpkin
* Decoupage Finish (Such as Modge Podge or Royal Coat)
* Foam or Paint Brush
* Cream or Off White Paint (Not Pictured)
* Brown Paint (Not Pictured)


First, I gave the pumpkin a coat of primer of cream paint (nothing neat) and let dry for about an hour. I did this so the orange would not show through. I also used brown paint for the stem. Personally, I didn't like the funky color that came with the pumpkin.

While the primer coat was drying, I cut various lengths of the Vintage Dictionary Pages to have ready.
I started adding the Royal Coat to the pumpkin.
I slowly started adding the Vintage Dictionary Pages to the pumpkin being sure to constantly press in and rub the pages down.  
Continue adding pages until your whole pumpkin is covered. Don't worry about the size of the pieces. This gives your pumpkin character. Just be sure you keep pressing and smoothing as you go. It will be messy, just allow yourself to be a "kid" again! :-))))

Once your pumpkin has dried you can embellish it with some leaves if you wish. I added a Memo pin at the base of the stem and I stamped Autumn in Pumpkin ink over a wheat stalk image on a grungy tag and placed it inside the Memo pin.
Here's the finished Vintage Pumpkin. Remember how, I mentioned seeing these in a gift shop? Those pumpkins had no leaves, no memory pin, no tag, no extra embellishments and they were charging a pretty penny. There are many possibilities. 
I hope you will stop by the The Kraft Outlet and pick up some Vintage Dictionary Pages and embellishments to make some fall pumpkins to decorate your home.

~Tammy~

Make Your Own Coasters!


I have a fun little project to share. With the holidays approaching and budgets tight, I thought I would share a DIY thrifty gift to give. I first made something similar when I first started stamping at a stamp camp many moons ago.

I am also going to apologize because I didn’t have anyone around to help take pictures, so I don’t have the best pictures to share.
To get the fun started we need some supplies!
  • ·      4 x 4 Stone Bathroom Tiles
  • ·      Felt Pads
  • ·      StazOn Ink
  • ·      Minwax Finishing Wax
  • ·      Soft Cloth such as an old t-shirt
  •     Stamps

Please note: StazOn Ink is designed for decorating semi-porous projects.  It will also stain your stamps. Just be sure to clean them as soon as you are finished. It will not affect the image in any way.

Be sure to evenly ink up your stamp with StayzOn Ink. The trick to stamping on stone is being patient and holding longer then you normally would with paper.

Stamping on porous stone is going to give you an uneven look in your stamped images.  This gives the appearance of a worn old-world feel. If this is not what you want, then you need to look for a different tile.


Next I am going to show you how NOT TO PANIC if you stamp the tile and you don’t like the image once you have stamped it.  Personally, this is the look I am going for, but If I wanted to start over…have no fear…it can be done….

StazOn is permanent and once you stamp it…it’s on there and soap and water won’t remove it, BUT Magic Eraser will!!!!

As you can see the image is about to be erased…


Here it’s starting to fade. You can also see how well loved my Magic Eraser is! I am telling you whoever invented this should get the Noble Peace Prize because in my house this is something I cannot live without and it can clean anything.  Case in point here!


Just continue to stamp the images randomly till you are satisfied with the end result. I choose to use the same image from Delicate Dollies II.

I love the worn look. It also looks way COOLER in person.  I wish you could see it! I guess that means you will have to give it a try yourself! J  The person I have in mind for this project loves blues. It's gorgeous in browns and black! The possibilities are endless. 

Next use your cloth for your finishing wax. This is to seal the tiles now coasters!

Apply over the entire surface to include the sides.

Add the felt pads to each corner on the back side.


Now the fun continues with dressing the tiles up in a pretty bow and tag for that special someone.

I hope you have a great day!  I will see you in a few hours with another home decor tutorial for The Kraft Journal!
~Tammy~ 

Tuesday, October 30, 2012

A Happy Birthday Rainbow Style and Final hours....

Good Morning everyone....

(Yay! Woohoo This card was The Winner over at The Ribbon Reel on 11/12/12...Thank You so much ladies)

*Edit to note....my apologies as this post was to go live at midnight and I didn't catch it due to all that is going on with our friend Hurricane Sandy I guess when I updated my post yesterday I must not have hit the correct button to update it*

I hope this find everyone doing well! To those who have been affected by the storm I hope you are safe from harms way and have not suffered much damage. We are counting our blessings in our house.

When I created this card, It was inspired by a knitted scarf I saw in a window of a shop when visiting a historic town I took my in-laws to while they were here for a visit. I was fascinated by the rows of colors knitted together. 
A colorful and happy Happy Birthday Card!

I have to admit, I love buttons on cards and what is more fun then a rainbow of them! 
Lots of various colorful buttons were used along a doily to add to this cheerful card. A beautiful pink bow was tied and added to the top of the tag and placed on top of a flower. (Just happened to be sitting on my desk, so I thought let's just use you why don't we):-)


I am heading over to Pixie's to add this as I used snippets to create! Always digging in my scrap box first! :-)


**Edit to add- personally joining this on the Ribbon Reel Challenge  - Over The Rainbow

Thanks for popping in with me! 

Blessings!

~Tammy~

Monday, October 29, 2012

Thankful for you, but not for Sandy

Hi!

Well, we are bracing ourselves for Hurricane Sandy. Spent the weekend preparing in-between the normal activities. Hopefully the last bit of superglue on the house dried so we won't blow away later on today. J


I have a card I made for my son's health care case manager to show my appreciation. She has really worked hard for my son. She has been invaluable to me,  and I would not have been able to navigate the system without her. 

Well, I am going to keep this short. Lots to do! So here is the card...
I started with Lunch Bag Kraft from The Kraft Outlet. I found some patterned paper in my scrap box perfect for this fall card. The top was cut using pinking shears. 
The stamped images are from Papertrey Ink First Fruits. I think this may have been the first "clear" stamp set I had ever bought!

Some beautiful crochet trim was added to the right side of the card face which was then accompanied by a length of beautiful seam binding which has been wrapped around the card and tied off in a fussy bow embellished with a button and twine. 

They have already canceled all schools and there will be no public transportation.  It's going to be a long day!   Here's hoping that this storm is all bark and no bite! 

I am going to play along with JUGS - Photo Inspiration

Hope you have a fabulous week in your world. I am also hoping you are not affected by this mess.

Blessings!
~Tammy~

Thursday, October 25, 2012

IBSIC #32 Gold, Silver, and Blue

Hi there sweeties!

I am popping on to share this weeks Inspired By Stamping Inspirational Challenge! It's a pretty one! Gold, Silver, and Blue using the photo as your inspiration. 

Here is what I have for you today!
I started this card by piecing together a snowflake and plaid patterned paper which was joined with some Gold Glitter Tape.
A circular tag was die-cut from cream cardstock, and the newly released Festive Frames was stamped to create the focal image. Tinsel Glitter was added to the edges topping it off with a beautiful bow made from white seam binding ribbon.
I hope you have enjoyed today's card! 
I am personally adding this to ABC Christmas Challenge - U It's Up to U, Pixie's Crafty Snippet Challenge Stamping for Pleasure - Rudolph Day

Thanks for stopping by!
~Tammy~

Wednesday, October 24, 2012

The Lord Planted the Seed - Ten Minute Craft Dash

Hello~

Happy Half Way Day!

(Very Honored that this card was chosen as a Ten Minute Craft Dash Favorite on 10/29/12)


I needed a breathing de-stress break, so I headed to my craftroom before bed last night and made a quick card using the Ten Minute Craft Dash as my inspiration.  Normally, this would make me sweat because I am a slow crafter, but I am making myself get comfortable with quick and simple thanks to this challenge. I also had time to think about what stamps I wanted to use since the challenge posted.


I started by stamping the flower silhouette on a white panel in Melon Berry ink, the sentiment in Rose Bud ink, and butterfly in Hawaiian Shores ink.  Pink patterned paper from my snippet pile was added to the upper portion of the panel and a unique border was created by taking a piece of scrap patterned paper and die-cutting it twice using a heart border die-cut and ric rac border die-cut to make this unique custom border to go across the bottom of my panel.  A length of ribbon was wrapped around the panel and tied in a bow.  A final finishing touch was adding an Aqua Boutique Button.  All that was left is to add foam adhesive and apply to my card base and I was all done! 

Total time for this card was 9 minutes and 4 seconds. I am not sure I will ever get under 9 minutes, but I am happy to make the deadline! I am just happy time doesn't start till after supplies have been pulled. Otherwise I would be in trouble. :-)

There are a couple of days left to play if you want to give the challenge a try. 


Jumping in at Pixie's Crafty Snippet Challenge this week!
Hope you have a great day!
~Tammy~

{Recipe}
Stamps: Wplus9 - Woodgrain Silhouettes
Paper: CS: Stampin' UP! - Whisper White, PP: Snippets
Ink: Momento_ Rose Bud, PTI: Aqua Mist, Melon Berry
Other: Dies: PTI, Ribbon: Stash, Buttons: DeNami Designs

Tuesday, October 23, 2012

Waltzingmouse Sketch 120

Hello~

In the effort to keep knocking those Christmas Cards out, I am sharing another today using the Waltzingmouse Sketch Challenge for inspiration.
Super simple, but super fun with cute papers and fantastic stamps! Victorian Frippery was used as my focal image and the white embossed sentiment comes from Seasons of Love

Here is the sketch from WMS
WMSC120
I rarely share photos other than the creative kind,  but I thought I would share a couple of photos from our weekend. We went apple picking this weekend after the short stacks soccer game. 

I also made a new friend!
Now, we must figure out what to do with these apples! :-) 

Thanks for popping by today!
~Tammy~

Monday, October 22, 2012

Inside and Out - Peace

Good Monday Morning to you!!!
Isn't this the cutest fox you have ever seen??? He comes from the new Paper Smooches Chilly Chums collection. A-dorable! 

We have a new challenge this week at The Kraft Journal "Inside & Out".  As you can see, for the outside of my card,  I am getting ready for a little Christmas fun!  I started with paper piecing Mr. Cool Dude Fox with  Brown Kraft Cover Weight Cardstock and patterned paper. The darling fox was then placed on some patterned paper and a die-cut snowflake also made of the Brown Kraft Cover Weight Cardstock then placed on some pretty complimenting snowflake patterned paper. I used a Chipboard Button embellished with some Brown Kraft Baker's Twine. Finishing touches for the outside of the card include painted embossed Holly Leaves, and a length of brown satin ribbon. A sentiment was added to the lower right corner from Paper Smooches Joyful Greetings. 
Now for the inside, I used some leftover snippets from the patterned paper on the front to create a panel on the top and bottom.  I added a die-cut ornament inking the edges then I stamped a sentiment from Paper Smooches Joyful Greetings sentiment set complete with a darling little heart. There you have it! 

I hope you will come play along with us this week at The Kraft Journal! All of our followers who participate in our challenges each month have a chance to be featured on our "Feature Me Fridays" post as well as be entered into a drawing to win a $15.00 gift certificate from The Kraft Outlet.  The more challenges you enter the more chances you have to win!

I am also adding this to the ABC Christmas Challenge for - U Up to U! Fussy and Fancy Friday - Anything Goes

I hope you have a fantastic start to your week!
~Tammy~

Sunday, October 21, 2012

Happy Birthday - DeNami Color Challenge

Hello

How's your weekend been going?

I thought I would pop on with a DeNami Designs Color Challenge Card today. I made a more simplistic card (for me). 
I started with the largest oval die and stamped the Elegant Floral Arch in Pumpkin Orange Ink on both ends of the oval. I used the Happy Birthday sentiment included in the All Occasions Stamp set.
A brown satin bow was embellished with a Tangerine Button and twine and added to center portion of the card. 

I added a piece of beautiful sage green flourish designer papers from Cupcake Cards and Gifts to serve as the beautiful mat for my focal image. The card base is DeNami Designs Chocolate Brown Cardstock.

As mentioned I am joining in the DeNami Designs Color Challenge.
Thanks for stopping by,
~Tammy~

Saturday, October 20, 2012

Inspired By Stamping October Review

I hope you've enjoyed this month's new release from Inspired By Stamping. I have one last card that uses the previously released Vintage Postcards, and the newly released Christmas Postcards Add Ons and Festive Frames.


I am personally adding this to the ABC Christmas Challenge for U - It's Up to U
I hope you have a wonderful weekend! 
~Tammy~

Friday, October 19, 2012

JOY

Hi There! 

I have a wintery card to share with you today.
I love to use non-traditional colors at the holidays! 

I am personally adding this to ABC Christmas- U Up to U Challenge.
Have fun this weekend and I will be back tomorrow with another project with the October Release! 
~Tammy~

Thursday, October 18, 2012

Inspired By stamping October Sneak Peeks

** Second post of the day...for my Halloween Inspirational Card click here Thank you so much **

Hi! Happy you could join me for the second day of sneak peeks for the Inspired By Stamping October Release.

This card shares a preview of Holiday Sentiments a great set to use for your holiday greetings. The sleigh was created using recycled materials and was embossed, painted and sanded and embellished with snowflake glitter for a touch of whimsical flair.  The Poinsettia is a new addition to the Inspired By Stamping store as well as the ribbon. IBS also has a great selection of crochet trim as you see above.

Next up is a card that uses some new goodies as well as previously released. 
Christmas Postcard is designed to coordinate with Vintage Postcards. So fun to mix and match to make this fun Christmas card. The greeting is from the new festive frames.  What do you think of that fun glittery blue ribbon?  Inspired By Stamping is now carrying Blue Glitter Ribbon Tape! How fun is that? In addition to the Red Poinsettia showcased above White will be carried in the store as well. 

For my final project, I created a Christmas Home Decor block to share. 
Featuring one of the new stamps from December 25th Labels shown above
I painted and sanded the edges. Next I cut and sized some coordinating patterned papers adhering before embellishing the block. 

I wrapped some red and cream  plaid ribbon around the block. I created a big fluffy bow embellishing with another satin ribbon from the IBS store. In the picture above you can see that a tag was stamped and created using a sentiment from Festive Frames
A Vintage image was added to the other side.
  
A snowflake was die-cut from glittered foam  and was
added for some dimension.

I hope you have enjoyed the sneaks for today and I hope you enjoy the rest of the design teams showcasing what's to come tomorrow. I am personally adding this to Crafty Sentiment Designs: Bows or Ribbons

Thanks for letting me share with you today!
~Tammy~