Thursday, January 31, 2013

Be Mine Valentine

Good Morning Friends!

I hope you are doing well this Thursday~

I have a sweet little Valentine for you this morning! I had to put together a card quickly, so a little short on time I am going to make this short and sweet! 
I began with cream cardstock onto which I layered a piece of kraft cardstock using the letterpress technique to the card base.   The beautiful stamps I used are from Waltzingmouse Stamps called Seasons of Love.  A fussy seam binding bow and button were added to the top.  
I used the sketch from The Paper Players this week. 

I am going to play along at Simon Says Stamp Challenge - Anything Goes.  Shop our Stash - Valentine/ Hearts (I have had that Designer Paper FOREVER). Crafting for all Seasons - Buttons and Bows, Cut It Up - Love is In the Air, The Pink Elephant - Hearts, Southern Girls Challenge - Get Krafty

I hope you have a Terrific Thursday! The Short Stack gets out of school early today! I must get to moving and make use of my time today!
~Tammy~


Wednesday, January 30, 2013

The Kraft Journal - Altered Peat Pots

Hi~

I have a Shabby Home Decor Project to share for The Kraft Journal! On my last tutorial for The Kraft Journal, I showed you how to make Vintage Page Dictionary Flowers. You can click here to review. I mentioned in that tutorial to stay tuned for a future post where they will re-appear. I have incorporated that flower in today's project. 

The Supplies you need include:
These items can be found at The Kraft Outlet:
Other Items
Peat Pot
White Acrylic Paint
Foam Brush
Hot Glue Gun
Heavy Duty Double Sided Tape
Any items you want for filling your decorated Peat Pot! :-)
The first step is to paint your Peat Pot inside and out using Acrylic Paint and a foam brush.  I like a Shabby look, so I did not cover the entire pot with paint.  I wanted some of the original showing through.  
While you are waiting for your pot to dry, die-cut your leaves from Vintage Dictionary Pages to embellish your flower.
Time to decorate the outside of your Peat Pot.  
Run some heavy double sided tape around the center of your pot.  Next take the Canvas Fringe Ribbon and ruffle it as you go by overlapping/pleating. I left a section in the middle open to place my focal embellishment.
Next I wrapped some Natural Hemp Cord around the center of the pleated Canvas Fringe Ribbon and tied a knot in the center leaving some extra long lengths for me to curl.
Cut a circle out of your Stretched Burlap. Add your Vintage Dictionary Paper Flower and die-cut leaves to the front.  Flip over and add hot glue to the back and adhere to the front of your Shabby Peat Pot! You can find something to alter in just about anything!!! 

Now you can fill this Self-Made Shabby Pot with whatever goodness your heart desires! 

Be sure to stop by The Kraft Outlet to check out the wonderful line of products including many of the products used today! I would love it if you dropped by The Kraft Journal and left me some love over there! :-)

The Kraft Outlet has just launched an endorsement program for everyone who loves to create with Kraft Products!
 Kraft Outlet Launches Endorsement Program

The Kraft Outlet knows you have many choices about which products you use for your paper craft projects. Through their endorsement program they hope to encourage you to use their products and thank you when your projects are published!  Click on the link above to find out how you can qualify to create and earn

Simon Says Stamp - Anything Goes
Transformation Thursday: 189

I hope you enjoyed this tutorial!
~Tammy~

Monday, January 28, 2013

Guest Designing at The Shabby Tea Room!!!

Hello Sweet Friends!

Good Monday Morning to you!  Today starts a new week at The Shabby Tea Room and I am so honored to be this week's Guest Designer. 
The Theme this week is "Cute as a Button"  Create a card or project inspired by the colors in the inspiration photograph and make sure you have a button or buttons or your creation! 
I was inspired by the adorable mittens....obviously {grins} and I had the most perfect sentiment in my collection from Paper Sweeties Warm Winter Wishes.  So this prompted me using the darling little heart button on my card! 

The darling mittens have been stamped in red ink and cut with their coordinating dies. A twist of baker's twine was added to string them together as they set nestled on the layered circles. A length of red-rac was added where the two patterned pieces meet.  The sweet sentiment was placed at the upper portion of the card front adding a mini paper clip embellishment. 
I would like to thank Debbie for giving me the honor of joining her talented team this week! I hope you will join in the fun and play along!  Please be sure to check out the rest of the talented ladies at The Shabby Tea Room to see what wonderful inspiration they have for you!
Debbie Marcinkiewicz - {TSTR Creator} - Simple Treasures

Lenet Mos - To Scrap or Not to Scrap, That's the Question

Rebecca Deeprose - Paper Primrose

Rebekah Faries - Midnite Lullabies Studio

Starr Timmons - The Paper Chase

Tracey Kelly - Trace Elementz

I would also like to join the sweet gals over at Word Art Wednesday - Anything Goes and DL Art - Anything Goes. 
I hope you have a wonderful Monday and start to your week!
~Tammy~

Friday, January 25, 2013

Have a Beautiful Day - TSTR 150

Hey Everyone!

{Yay! this card was chosen as TSTR Honorable Mention Cup of Tea on 1/28/13}

I hope this find everyone snuggled up and warm. Yesterday was a snow day in my area (not much snow) and today they called for early dismissal predicting snow. However, I think it was a little knee jerk.  We are just starting to see some flurries. Oh well, we snuggled up from the bitter cold with some hot cocoa! Which brings me to my late post this evening. I had intended to get this up earlier in the day, but a change in plans due to Mother Nature I guess! :-)

I have been working on a large card order and DT stuff, but I needed a birthday card for a special friend, so I took a break and a little inspiration from The Shabby Tea Room.

I started with a white card base and I pieced together my patterned papers adding a length of crochet trim and a strand of gorgeous pearls. A prompt I took from the inspiration photo.  A heart doily was added to the center. I created a paper rosette using a white and pink polka-dot patterned paper and embellished it with some beautiful blooms. Last but not least, Have a Beautiful Day from Paper Sweeties You are Fabulous set was added to the lower right corner of the card front with Chocolate Chip ink.

Here is the inspiration from The Shabby Tea Room!
The theme is 'Just Pretty' use this beautiful photo for inspiration and create a card or project inspired by COLORS IN THE PHOTO AND INCLUDE STRIPES AND A FLOWER!


I would also like to mention that Paper Sweeties is having a Facebook Fan Page Contest!!!! You can check it out by going here! Good Luck!!!!


Just another little reminder that Paper Sweeties Sketch Inspiration #3 challenge runs through January 31st … click HERE to see how you can play along for a chance to win TWO FREE stamp sets from the shoppe!

papersweetiessketch3 WINNERS announced ...

I am also playing over at Word Art Wednesday - Anything Goes
DL Art - Anything Goes
Thanks for peeking in this evening! 
~Tammy~

Wednesday, January 23, 2013

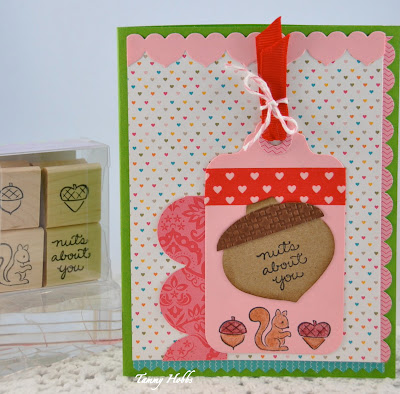
Nuts About You - DeNami Product Spotlight Blog Hop

Hello Friends!

{Happy Dance This card was chosen as The Grand Prize Winner at Scrapbooker's Paradise on 1/25/13}

Today the DeNami Design Team is spotlighting Nuts About You stamp set from the latest release over on the DeNami Design Blog.  You get a 10% savings for one week only! It's also a Design Team Blog Hop and I am your LAST STOP on the HOP!  Hopefully you have hopped along the way and left a comment for your chance to win this set! If you are just wondering in, no problem, you can find the list below!

I started with a card base from DeNami Iridescent Emerald Green. My starting point for the design began by creating an acorn for the sentiment Nuts about You.  
From there, I cut a tag and added some Red and white heart Washi Tape across the top of the tag.  At the bottom of the tag I stamped my remaining three images in the Nuts about You stamp set in Tuxedo Black Ink and colored in with colored pencils and mineral spirits. I used Red 3/8"Grosgrain Ribbon to thread the top of my tag and tied off in a bow using some pink pastel baker's twine.  Once the tag was designed, I then added it to my card front.

Now don't forget to leave a comment before you go! You could be the proud new owner of this set!!!

I am also joining in the fun at Scrapbooker's Paradise where they are Celebrating! What's nicer than to celebrate someone you are "Nuts About"?  Really Reasonable Ribbon - Valentines Day - Add ribbon, and City Crafter's Challenge Blog - Hearts

Thanks for stopping by!
~Tammy~

Monday, January 21, 2013

The Kraft Journal 105 - Punch It Out!

If you are looking for The Ribbon Reel Card click here.

It's Monday and we have a new challenge at The Kraft Journal "Punch It Out".  I  used 6 punches on my card.  It's so easy to get lost in the design process or at least it is for me. I have so many ideas sometimes when presented with a new theme or challenge that I finally have to have a starting point to build from.  In this case, my inspiration started when I had the idea to create a  medallion rosette out of a pretty blue patterned paper leftover from a previous make. I used a scallop border punch to get the scallop edges.  Using Lunch Bag Kraft, I punched a scallop circle and added some white paint to the edges. A snowflake was stamped using Paper Sweeties, Snow Friends, and punched with a 1" circle punch to add to the center of the medallion rosette. An aqua rhinestone was added to the center of the precious snowflake. 

A card base of Pacific Blue was then used to layer Lunch Bag Kraft and patterned paper adding more white paint to the edges.  Using the same patterned paper the medallion rosette was created from, I then used a border punch to create a beautiful trim to add to the bottom of her patterned paper.  A length of Natural Twill Tape was added to the lower portion of my card. Using Lunch Bag Kraft, my favorite to use, I used a large snowflake border punch (by Martha Stewart) to create a border and tucked it above the Natural Twill Tape  


After building the card base, I stamped and paper pieced the adorable winter snowman from Paper Sweeties Snow Friends and added ultra fine white glitter. I die-cut a butterfly from coordinating patterned paper that I used on the snowman's scarf and hat and also sugar coated it with ultra fine white glitter next adding to the center of the card. A sentiment was stamped from Paper Sweeties Friendship Warms The Heart and punched it out using a label punch. I added snowflakes to the punched out sentiment using VersaMark Ink and of course more white paint was added for a shabby look.  The final finishing touches were to add another paper border to the top, place the medallion rosette which has been coated with snowflake glitter and the placement of two pewter stick pins.  

Stop by The Kraft Journal to see what the other designers did this week with their scraps.  All of our followers who participate in our challenges for the month of January have a chance to be featured in the "Feature me Friday" post as well as be entered to win a voucher for The Kraft Outlet.

I am also joining in at Sweet Stampin' Christmas - Cold and Frosty
City Crafter's Chaellenge -  Winter Blues
Papertake Weekly - Baby It's Cold Outside
Word Art Wednesday - Anything Goes
Sunday Funday - Anything Goes
Thanks for stopping by! Hope you have a fantastic week!
~Tammy~

Sunday, January 20, 2013

The Ribbon Reel #45 - Love You To My Core

Hey there sweet friends!

I am popping in this evening to kick off the new bi-weekly challenge for The Ribbon Reel! Each week I am amazed by your beautiful creations in the gallery and I always look forward to your interpretation of the inspirational photo.  
Jeanne is our lovely host and she ask that you use the inspiration photo below plus Burlap and Twine.
TRR#46 1-21-13
I started with a Rustic Cream card base and added some darling polka-dot paper at the bottom of my card front.  Tip: Don't hesitate to look through your holiday papers when creating. This is actually from a Christmas stack and was a scrap leftover from a previous make. A length of Natural Woven Burlap was added to the middle of my card. Can I just say I love this stuff) It adds such beautiful texture to your cards. 

I decorated a Plain Kraft Little Bitty Bag with some sweet stamps from Paper Smooches in Sepia Tone Ink. I took a snippet of 50 mm Burlap in Brown and added it to the outside of the Little Bitty Bag.  A pinking square was die-cut and given a touch of white paint for a rustic look.  The paper pieced Apple also from Paper Smooches was added to the center.  
  
A little tag was created for the inside using Brown Button Twine to the top of the tag. A final finishing embellishing touch was adding a fussy Brique Seam Binding Bow embellished with a Red Gingham ButtonBrown Button Twine, and a Made With Love Nickel Charm.  
Be sure to head over to The Ribbon Reel and be inspired by all the other talented design team gals.  You can also hop to their blogs by clicking on the links below.


  • Debbie Marcinkiewicz - Simple Treasures
  • Helen Berry - Helen Berry Design
  • Jeanne Jachna - A Kept Life
  • Lenet Mos - To Scrap or Not to Scrap
  • Michelle Bala - My Passion For Crafting
  • Sarah Ingle - Lazy Daisy
  • Tammy Hobbs - Creating Somewhere Under The Sun (that's me)
  • Zuzana Obert - Jelly Welly
  • Keilly Mulvihill - Keilly's Little Blog


  • The challenge runs bi-weekly so you have two weeks to show off your beautiful work. The more times you participate the more chances you have to win some free goodies from The Ribbon Reel. 

    I am also adding this to Word Art Wednesday - Anything Goes
    DL. Art - Thankful Thursday - Anything Goes
    Sunday Funday - Anything Goes
    Have a great evening!
    ~Tammy~

    Friday, January 18, 2013

    10 Minute Craft Dash - You Are Just The Sweetest

    Hello Sweet Friends~

    I took a break tonight from working on Design Team Projects to play in the 10 Minute Craft DashI totally adore Paulina, but her crazy challenge has a tendency to cause hyperventilation! Tonight, I nearly blew it. I had my supplies gathered and design concept in my head. Seems easy enough except I can't stop fidgeting with things. I was like 5 1/2 seconds away from failing the challenge!  The sponsor this week is WPlus9 - Sweet!~ Love Love Love them! So, I knew I wanted to pull out some stampy goodness from WPlus9.

    My inspiration actually started with the framed die you see above. When I was working on my Cloud9 post last week I die-cut this frame, but I went in a totally different direction with that card. (Enter Crafting ADHD), so all I had to do tonight was stamp the frame! I keep a bag full of die-cut pieces that I didn't ended up using! At some point that bag always comes in handy, such as tonight! 

    I started with a base of Pink Pirouette which was leftover from a previous make. I just scored it in the middle.  I added my green gingham paper.

    I stamped the frame and strawberries from WPlus9's  - Fresh Picked and added a button to the center. Because I couldn't stand it without twine. I had to go back and add the twine. ( enter fidgeting) :-) I quickly cut a white panel and adhered my framed strawberries to the center and stamped the sentiment in Momento London Fog. 
    Next I added a length of Pink Pirouette ribbon to the top and tied off in a knot. (enter more fidgeting).  Edit to note, that a knot is quicker than trying to tie a pretty bow when your are almost out of time...And THE Last final fidgeting touch, was adding some white paint to the card. This card is making me wish for warmer weather! 

    Final time to complete! 

    Yep an almost fail!
    If you have 10 minutes extra this week....you can get the details of the challenge here.  It sure is a pretty color palette to work with.
    CD_10

    I am also joining in at Word Art Wednesday - Anything Goes

    That's it for me tonight! I have a few more things to work on before I hit the sack!
    Hugs and Blessings!
    ~Tammy~

    {Recipe}

    Stamps: WPlus9 - Fresh Picked

    Paper: CS: Stampin' UP! - PP: Hobby Lobby
    Ink: Momento_London Fog, Pear Tart - Stampin' UP! - Pink Pirouette
    Other: Dies:WPlus9, Ribbon: Stampin' UP!, Button: PTI, Twine - The Kraft Outlet, Paint - AC Moore

    Wednesday, January 16, 2013

    Paper Sweeties January Release Wrap Up

    Hi Friends!

    I have one more card to share with you as the final wrap up to the January Paper Sweeties release.   I went with a more CAS card today. If you are like myself, a busy Mom, you may find yourself needing a card for a last minute birthday invite or you get busy and didn't get a chance to make the card and guess what today is the party. I wanted to create a card that was relatively quickly to put together that puts focus on the sentiment, but still has pretty details. 
    I started with a bright pink card base. I took a panel of white cardstock and embossed with a damask pattern.  Three rows of connecting hearts were die-cut from a brushed pink patterned paper from my stash and added to the embossed panel. 
    Using an oval die, I stamped my sentiment in a fun and bright pink ink to the center. Next I added my paper pieced Princess crown embellished with pink jewels! For a bit more glitz, I  added a few more jewels to the bottom of the sentiment. I nested this inside a Labels 18 Spellbinders die. 

    There you have it! A card ready to go for that next Birthday Party. 

    Don't forget about our January Sketch Challenge which runs until the 31st! You will want to enter to win TWO FREE stamp sets from the Paper Sweeties Shoppe:
    papersweetiessketch3 Paper Sweeties Sketch Inspiration #3 challenge!
    I have truly enjoyed my first assignment as a Paper Sweetie Design Team member. Please head over to see what the other talented ladies have to share today!

    Thanks for stopping by! I hope you have a wonderful day!
    ~Tammy~

    Tuesday, January 15, 2013

    Paper Sweeties January Release

    Hi!

    It's Day 3 of the Paper Sweeties January Release and the stamps are officially in the store ready to add to your shopping carts!!! Today I used the stand add-on, but I am showcasing it in a different way! 
    My son was so excited when I finished this project that he requested these for all his teachers! As you can obviously see, I created a school house on the cover of my mini legal pad complete with matching pen. 
    The Inside
    The roof, windows, door, and flag were all fussy cut to build my school house. I used colored pencils and mineral spirits for the door. The roof was was embossed for added texture although I am unable to get that to show up in the photograph.

    Finishing touches include buttons, twine and a ribbon tab.

    The School Days sentiment is from the Boutique line So Proud of You. 

    • Visit the "New" January Facebook Event! Share your Paper Sweeties projects here!  One event attendee will win a FREE stamp set.  The winner will be announced 1/21/13. 
    • Like Paper Sweeties Facebook Fan Page!  One Lucky Fan will EARN a FREE stamp set.  The winner will be announced 1/21/13. 
    • Follow Paper Sweeties on Pinterest! One Paper Sweeties Board follower will receive a FREE stamp set. The winner will be announced 1/21/13.
    Check out the Paper Sweeties Splitcoast Stampers Company Gallery
    Visit the Paper Sweeties Flicker Gallery and upload your creations there! 
    Sign up to receive the Paper Sweeties Newsletter to receive subscriber only discounts!
    **FREE SHIPPING!!!** Today through January 20th!
    free-shipping
    Use coupon code: FREE SHIPPING at checkout to redeem your discount! 

    I hope you will visit the other Design Team ladies to check out their amazing projects. Just click on the ladies names below to hop on over to see what they have for you! 

    Thank you for stopping by! I will be back tomorrow with one last card for this month's release.
    ~Tammy~