Sunday, June 10, 2012

Merry Monday on Sunday :-)

It has been a busy week, so it's been hard finding time when to squeeze this post in. I will be just squeaking  in the final hours. I adore Lesley's CAS sketches, and it's just what I needed. I had the honor of guest designing for her last week, so of course I couldn't let this sketch close out without playing along!

So here we go!

Again, another non-tradional, but elegant Christmas greeting. The patterned paper is from DCWV La Creme stack.
For my reindeer (Stampin' UP! Winter Post), he was stamped in Versamark Ink, and then heat set with black embossing powder. For a fun touch a pearl was added to his nose. :-) He was mounted on a die-cut star adding pearls to each point.
Can I just say I am in love with this beautiful vintage greeting! It comes from Crafty Secrets Vintage Christmas. The snowflake is from the same set. You may not be able to see it, but a white pearl was added to the center of the snowflake. The sentiment panel was mounted on a Basic Black scalloped border panel and adhered to my card front.
Clean and Simple, but made with love and one more Christmas card complete!
Here is the Merry Monday Sketch! 
I hope you enjoy the rest of your day!
~Tammy~

{Recipe}
Stamps: Stamping' UP! And Crafty Secrets
Paper: CS: Stampin' UP!, PP:DCWV
Ink: Jenni Bowlin 
Other: Pearls: Michael's, Dies: Spellbinders, Punch: Stampin' UP!, Embossing Powder, Heat Tool,

Saturday, June 9, 2012

Inspired by Stamping June Review


Joanna has asked each of her Design Team to create a project with a set from the new release. You will have to be sure to see what the other lovely ladies created.
I was asked to use Oh, Baby!  The focal panel showcases the pram, but just above the buttons you will find that I used the new released Vintage Background set. 
A length of my own hand dyed seam binding was added to the right side of the card front which was tied in a fussy bow embellished with a button, twine, and tag stamped using the pacifier from Oh, Baby and part of the sentiment from All Year Wishes II.
A sentiment panel was added to the left portion tucked under the length of crochet trim.  The colors are gender neutral which is always nice to have on hand if you are in a pinch and need a card! :-)

Introducing the set I have been asked to showcase today....Oh, Baby!
Be sure to hop around to the other talented ladies to see what sets they have to showcase today.

I found further inspiration at Pretty Little Ribbon Shop - Lots of Layers


I hope you enjoy the rest of your weekend!
~Tammy~

{Recipe}
Stamps: Inspired by Stamping:
Paper: CS: Stampin' UP!, PP:  Stampin' UP!
Ink: Stampin' UP!
Other: Dies: Spellbinders, Twine: Jo Anne's, Buttons: PTI, Crochet Trim: Etsy, Seam Binding stash died by Me

Friday, June 8, 2012

Cross Stitch Thank You

Hi There!
 I have created a card to share perfect to thank a teacher with a home spun feel using a Cross Stitch stamp.
I took the Card Patterns sketch for the week and tweaked it slightly.
I shopped my stash with some fun papers I had been hoarding and that was the inspiration for this card.   This stamp coordinates nicely with the Spellbinders Labels 3. I love love love stamps and dies that coordinate nicely together. 
Some pearls and a button were added to the card for a finishing touch. 

As I mentioned, I liked the sketch at Card Patterns, so I found my inspiration for my card there.
Thanks for visiting me today! Hope you have a fantastic Friday!
~Tammy~

Thursday, June 7, 2012

Happy 100th Waltzingmouth Sketch Challenge

Hi there!

It's been a busy week on the ol' blog, but I couldn't let the week go by without joining in the fun to celebrate Waltzingmouse 100th Sketch Challenge! Yay! Although, I have just recently joined in the fun there, I have admired their sketchs for a long time.  I am proud to be a recipient of their Top Mouse honors, and I cherish it!

So here is a card, I created with their current 100th sketch to celebrate. 
I totally shopped my stash on this one and used papers and flowers I had been hoarding!  

The border is from Waltzingmouse Victorian Frippery...so so pretty.  I stamped it in Razzelberry ink.  I stained the edges with tea stain and applied to the lower portion of my patterned paper. Above the stamped border a row of die cut hearts was added. 
I used a frame from Waltzingmouse Vintage Labels 18 and used a sentiment from Victorian Frippery. I dressed up the focal point with some sweet pearls.  I layered this onto some pretty green patterned paper.

A length of white seam binding was added to the left portion of the card front and tied in a fussy bow embellishing with a beautiful paper flower and leaf.

Here is the sketch! Head over to here if you want to join in the fun too!

WMSC100
Also joining in the fun with Really Really Reasonable Ribbon- Use ribbon/lace and flowers somewhere on your project.
Thanks for visiting with me! 
~Tammy~
{Recipe}
Stamps: Waltzingmouse Stamps: Vintage Labels 18 and Victorian Frippery
Paper: CS: Stampin' UP!, PP: Stampin' UP! 
Ink: Colorbox: Razzelberry, Versafine: Vintage Sepia
Other: Dies: Spellbinders and PTI, Flowers: Stash,, Seam Binding: Ebay

Soak Up the Sun

Hi Friends! 

I have another Clean and Simple card to share today! It's another fantastic challenge at Inspired By Stamping and this week Joanna has a sketch for you to try. 

Here is my card! :-)))
Here is the Sketch:
IBSIC-#12

I totally went away from my norm. Instead of reaching for my very loved seam binding or crochet trim, I decided to find inspiration in my overflowing ribbon jars.  I used this ribbon a lot when I lived in Hawaii so I thought why not bring it out again, so that was the start to my inspiration.  My papers are from Cupcake Cards and Crafts and is part of a collection called "Last Summer".  My stamped images are from Inspired By Stamping: Inspiring Sentiments which is nested inside Fancy Labels 3. 

The sun was cut using my Cricut, and buttons, pearls, and a flower were the final finishing touches. 

I hope you will join us this week! I love love seeing your wonderful creations in the IBSIC gallery.

I see Papercraft Star is having a Here Comes Summer Challenge, so I will join in over there!

Thanks for peeking!
~Tammy~
{Recipe}
Stamps: Inspired by Stamping:  Fancy Labels 3, Inspiring Sentiments
Paper: CS: Stampin' UP!, PP: Cupcake Cards and Crafts
Ink: Versafine: Vintage Sepia
Other: Buttons: PTI, Ribbon: Offray, Pearls: Hero Arts, Flowers: Stash,  Dies: Spellbinders, Cricut

Wednesday, June 6, 2012

Inspired By Stamping - Day one of June peeks!

Hello crafty friends,

Today is the first day to the June Inspired By Stamping countdown festivities.  We are kicking off the countdown with sneaks at some of the sets being released on Friday.  

So let's get to some projects shall we!
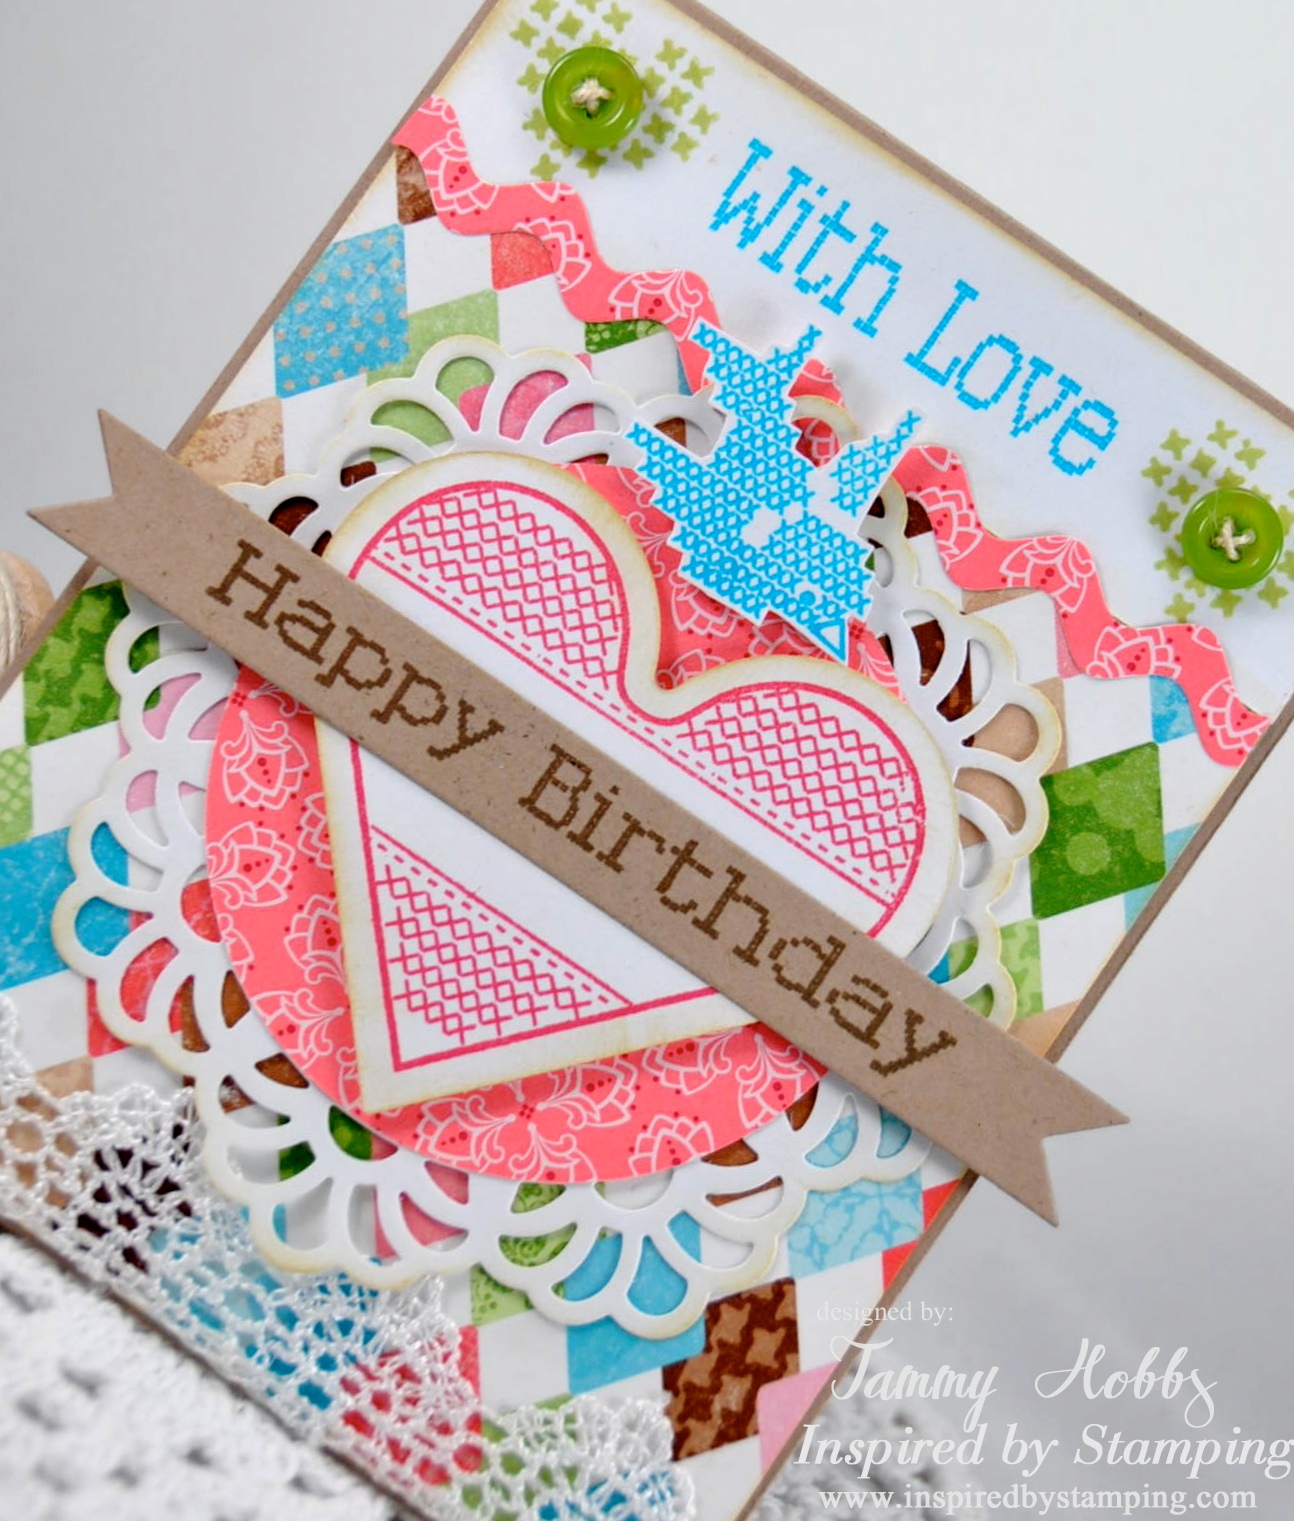
This card uses 6 new stamps from this wonderful set called Cross Stitch which was inspired and co-designed by our lovely design team member Deb Hickman. I love the homespun feel to it! I stamped the small cross stitched hearts twice at the top portion of my card leaving the center open for the  cross stitched sentiment With Love.  The cross stitched bluebird you see in the center was fussy cut and applied with foam adhesive to give dimension. 
The focal cross stitched heart coordinates nicely with the Spellbinders standard heart dies.  I created a hand-cut sentiment banner for the Happy Birthday greeting (which are two separate stamps in this set) 

Below shows you the inside of my card stamped with a greeting from a set called Birthday Greetings.  It's a set that will be incredibly useful for stamping the inside of all those birthday cards you create!

Up next is a coordinating card and home decor frame using Elegant Flowers. This set focuses on gorgeous floral images.
I took an already beautiful frame and dressed it up a bit. I created a background paper starting with kraft cardstock stamping the rose image in red ink. I added s strip of burlap to the center. A die-cut of cream cardstock was used to serve as a mat for the rose images and sentiment (which you will see more from this set tomorrow from other Inspired By Stamping design team members)
The rose was stamped and fussy cut and mounted with foam tape for dimension. 

This card as well as the frame uses a technique I like to use a lot called repeat stamping. This allows you to create your own designer paper. I simply took the rose and rotated my stamp as I stamped my cardstock. As with the frame, a single rose was stamped and fussy cut and mounted with foam adhesive for added dimension. The Happy Anniversary sentiment is from Cross Stitch.

My final sneak I have for you today is a card using some background patterns called Background Basics

I created a banner across the top using the images from Background Basics.  The possibilities are endless with this set. 
The focal sentiment is from a previously released set called Small Fancy Label 4. The flowers can also be found in the IBS store. 

I hope you have enjoyed todays projects, and please pop over to see what the other talented Inspired By Stamping Design Team gals have created for your viewing pleasure. 


Joanna will be giving away blog candy to one lucky customer. They will receive their choice of 1 6 x8, 1 4 x 6 and the Vintage Sayings stamp sets.  Be sure to leave a comment each day to increase your chances. Also note on Friday and Saturday ONLY, Shipping is on Inspired By Stamping. Enter code: freeshipping


**I am personally entering my Wishing you the Best banner card at The Ribbon Reel - Use a die-cut, ribbon plus the colors 
(CORAL, BRIGHT/CHARTREUSE GREEN & BLUE) **
as well as the Pink Elephant - Use Vibrant Colors
**I would like to enter my frame project at Our Creative Corner - Embellished Frame
Thanks so much for sharing a bit of your day with me.
~Tammy~

2012 Graduate

Hi!

Have you ever received a High School Graduation invitation in the mail and think wait a minute did I read that right and you suddenly feel OLD!  Well, that is just how I felt for the recipient of the card I have to share with you today. The last time I saw him, I think he was 7 playing little league and now he is a high school graduate.  It seems like yesterday!

Since it is a young man, I kept my design clean and fairly simple. (For me that requires sitting on my hands very tightly). I have to laugh because I got a request from someone that they would like to see me do some CAS. If you are reading this, here is one for you! :-))) 
It's a tall card. It's been awhile since I have done one of those. I used the young man's school colors as my inspiration. I used Fancy Labels 3 Frame from Inspired By Stamping to create a frame for the graduation hat which was cut using my Cricut. 
I used an embossing plate from Stampin' UP! to add texture to the black cardstock.
I am going to keep this short and sweet! I will be back in a few hours with my Inspired By Stamping Sneak Peek Post! 

I am going to join in The Kraft Journal's Challenge this week: Graduation. 

Thanks for popping by!
~Tammy~

{Recipe}
Stamps: Inspired by Stamping:  Fancy Labels 3
Paper: CS: Stampin' UP!, PP: Making Memories, Stampin' UP!
Ink: Stampin' UP!
Other: Dies: Cricut, PTI, Spellbinders, Embossing Plate: Stampin' UP! 

Tuesday, June 5, 2012

Guest Designer for City Crafter Challenge

Hi!

I am thrilled to be the Guest Designer this week at the City Crafter Challenge Blog.  I always enjoy their challenge, so I am honored to be their guest designer for the week. 

This week the theme is Coppelia create a project with a ballerina on it. The sponsor is Digital Paper Shop they have a wonderful collection of digital papers and images in their Etsy shop. 

The card I created uses images from our sponsor this week.  The ticket images and beautiful ballerina focal image are all from The Digital Paper Shop.
I used a white card base and added a textured soft blue patterned paper with a beautiful white border to the left portion of my card base adding the beautiful image embellishing with white vintage buttons, pearls and a handmade chipboard glittered heart also tucking in some beautiful tickets. 
A length of crochet trim was added to the top portion of the card.  The word Paris was stamped in Charcoal ink just above the focal image. 
Next a length of seam binding was added between the Eiffel Tower tickets and the blue patterned paper.  A resin flower was added to the center of the fussy bow and a sentiment.

I hope you will play with us this week for a chance to win!  

I hope you have a fantastic day! As always, I cherish your visit with me!
~Tammy~
{Recipe}
Paper: CS: Stampin' UP!, PP: Stampin' UP! and Digital Paper Shop
Ink: Palette 
Other: Buttons: PTI, Glitter: Martha Stewart,  seam binding, Ebay, Resin Flower: Stampin' UP!  Twine: Joanne's, Crochet Trim: Michael's.

Monday, June 4, 2012

Guest Designing for The Shabby Tea Room week #117 - Sweet Summertime

Hello - 

I am so honored to be guest designing for The Shabby Tea Room this week. 
The theme is Sweet Summertime and the challenge is to create a card, layout, or project finding inspiration with the photograph and using the colors Teal or Aqua, Pink and Brown.
I was inspired by the teacup and the stripes in the table cloth as well as the pearls. Instead of being literal and using pearls, I went with a pink polk-a-dot paper to represent the pearls. 
To dress things up a bit, a length of seam binding (from Deb's Simple Treasures) was added and tied in a fussy bow embellished with a button and twine. 
A beautiful frame was stamped inside a coordinating die to serve as my focal image adding the delicate teacup to the center further adding some embellishing touches with a paper rose and trimmings from a vintage book.

Please be sure to visit the other Shabby Girls' blogs to check out their AMAZING inspiration this week:

Fran Westmoreland - Purple Peanut's Crafty Blog

Lenet Mos - To Scrap or Not to Scrap, That's the Question

Rebekah Faries - Midnite Lullabies Studio

Starr Timmons - The Paper Chase

Tammy Roberts - Paperie Sweetness


Debbie Marcinkiewicz - {TSTR Creator} - Simple Treasures


Thank you so much for visiting me today!
~Tammy~

Friday, June 1, 2012

Smiles are proof of everyday miracles

Hello Lovelies! 

It's been awhile since I have joined the fun on the Unity Blog for Friends with Flair, so I am popping in today. I also can not believe we are half way through the year already! Seriously, I feel like I was just celebrating on New Year's Eve. 

I started with a kraft card base (Stampin' UP!) and created two panels using the letterpress technique. I used Very Vanilla, so it's inked very subtly.  I added the polk-a-dot patterned paper to the lower potion embellishing with a length of crochet trim and buttons. 
I chose to use a Unity sentiment as my focal image, and I apologize as I do not know what set this is from as I won an assortment of stamps in a prize pack. :-) Lastly, I embellished with some flowers in my stash.
I found further inspiration with these great challenges.
That's all for me today! I hope you have a Fantastic Friday! Don't forget to hop along with Friends with Flair...you could win a prize for just leaving some love.
~Tammy~