Monday, December 17, 2012

The Kraft Journal - Favorite Projects of 2012

It's Monday, and it's time for another challenge at The Kraft Journal. We have an another easy one for you and that is to post your Favorite Project from 2012 you shared with us at The Kraft Journal. 

I just joined the team in September, but I have a few reflecting back I thought I would share with you today. 

You can check out the original post here.
I loved the apple shape and the whimsical font of School Days. Such a fun time of year!

You can check out the original post here
I always love c-fluted corrugated cardstock. 
You can check the original post here.
Loved the fun happy colors and the swanky snowdude.
You can find the Original Post here.
I love the fun embellishments they have at The Kraft Outlet 
such as the Memo Button
It just added a nice touch to this adorable and fun card. 
I did a couple of tutorials, but I think my pumpkin covered with
Vintage Dictionary pages was my favorite! 
You can read the original post here.

I hope you will come and play along by sharing your favorite project you made for The Kraft Journal in 2012.  All of our followers who participate in our challenges for the month of December have a chance to be featured in the "Feature me Friday" post as well as be entered to win a voucher for The Kraft Outlet.

So happy you stopped by for a visit today! I hope you have a great week!
~Tammy~

Friday, December 14, 2012

My Coolest Friend...

Hello~

**I am so honored that my coolest friend snowman card was selected at the Winner at Tuesday Morning Sketches on 12/17/12! Thank You so much ladies!!**

I am back with a fun little card today with the intention of using as one of my Thank You notes. 

I started this card by adding the adorable tree patterned paper by My Mind's Eye to my card base. I then  die-cut my ovals to stage as my base for my darling little snowman which has been fussy cut and paper-pieced and adhered in some glittery snowy hills! :-) Using Versamark Ink, I randomly stamped some snowflakes in the background.

A length of white seam binding was wrapped around the card front and tied in a fussy bow embellished with a pink button, twine and some aqua jingle bells.  Two different snowflakes were die-cut and stacked adding a pink button to the center. My coolest friend sentiment was stamped, cut, and adhered in a fun scattered way if you will.

Inspiration for my card was found at Tuesday Morning Sketches - Sketch plus non-tradional Christmas Colors.
City Crafter Challenge Blog - Snowman fun in non-tradional Colors

The Ribbon Girls - Ho Ho Ho Christmas

I Just wanted to say a big thank you to the gals at City Crafter who awarded this card with their City Crafter Spotlight Artist. 

I hope you enjoyed my fun little card today. 
Hope you have a fantastic Friday!
~Tammy~
{Recipe}
Stamps:  Paper Smooches - Swanky Snowdudes
Paper: CS: Stampin'  UP!, PP: My Mind's Eye, DCWV, Cupcake Cards and Crafts
Ink: Momento: Tuxedo Black, Versamark
Other: Dies: Spellbinders, PTI, Buttons: Hobby Lobby, Pearls: Michael's, Twine: Joanne's, Bell's: Michael's , Seam Binding: Etsy

Wednesday, December 12, 2012

Working on some Thank You notes....

Hi!

**Thrilled this was given the Honorable Mention Cup of Tea at The Shabby Tea Room on 12/17/12**

I started off with good intentions of getting ahead of the game to create some thank you notes for after Christmas. I am finding it hard to steal some crafty time, blog hopping time, and even time to get some holiday shopping done. My days have been filled lately with non-holiday busyness (boo), but at last, I snuck a quick card in today. 

 I started with a rustic cream card base and inked the edges .  I have used some various goodies on my card. I die-cut a poinsettia out of some fun pink, polka-dot patterned paper that was in my scrap box left over from another make, and I inked the edges as well as added some snowflake glitter.  As I layered the pieces I added a remnant of a crochet trim piece on my desk and topped with a button and twine.
From a previous make, I had leftover pieces of book print that had been cut using a pennant die and I added those to the top of my card adding various size pearls to the top. 
Patterned paper was added to the bottom of the card front and a length of silver snowflake trim from Mayarts was added across.  A tag was created inking the edges and a wreath was stamped in aqua adding pink berries. A fussy seam binding bow was created and embellished with a button. A finishing touch was to add my entiment from Paper Sweeties - You Make Me Smile

Inspiration for me card was found at the current Shabby Tea Room Inspiration Challenge.
Make a project inspired by the colors of PINK, AQUA & SILVER and INCLUDE GLITTER!
 The Catered Crop - Tag You're It Recipe Swap  - Make a tag or incorporate one on a card.
Tuesday Alchemy - Anything Goes

Well, I hope everyone is doing well! Have you got your shopping done?  I have NEVER been this far behind. I actually have no desire to get out in the mess. I am putting it off.

Have a wonderful Wednesday!
~Tammy~
   

Monday, December 10, 2012

The Kraft Journal - Anything Goes and DeNami Designs Theme Challenge

Hi!

* If you are looking for my DeNami Designs Pretty Packaging Blog Hop Post, click here and for The Ribbon Reel Design Team Post click here.*

Today start's a new challenge at The Kraft Journal.  Since it's a busy time of year, we are keeping up with making things easy over at The Kraft Journal this month...how about Anything Goes as long as you use KRAFT!  

I took the opportunity to create a birthday card since I need one for a friend.  I started with a base of Brown Kraft Cover Weight Cardstock which was layered with some pretty Graphic 45 paper. I took a left over die-cut label that was cut from some Buff Ivory Cover Weight Cardtock and cut the ends and adhered to the top and bottom of the card face. I took a length of Natural Twill Tape and tied around the card front and finished off in a bow. 

Next I stamped the Birthday Cake image from DeNami Designs, then die-cut the squares from Brown Kraft Cover Weight Cardstock and Buff Ivory Covery Weight Cardtocand inked the edges.  
The final finishing touch was to add the Happy Birthday sentiment by DeNami Designs.

I am also joining in the fun at DeNami Designs for their last challenge of the year.  It's a Theme Challenge which is Celebrations.

I hope you will play along with our Anything Goes challenge this week at The Kraft Journal.  All those that participate in our challenges for the month will have a chance to win a $15.00 gift certificate from The Kraft Outlet....and you also get a chance to be considered for The Feature Me Friday artist post on The Kraft Journal blog!

I hope you have a blessed week!
~Tammy~

Sunday, December 9, 2012

The Ribbon Reel #43

Hi!

*I am honored to note that this was featured as one of the Spotlight Artist cards at City Crafter Challenge on 12/11/12. Thank you ladies*

Hello Sweeties and I am excited to be back this evening with my first Design Team post for The Ribbon Reel. I was absolutely tickled pink when Keilly asked me to join her team.

This week you are asked to use the photo inspiration you will find below and add Kraft, White, Red, Ribbon, Button and Twine somewhere on your project. 

I started off by stamping my snowflakes with a sand ink on my card base pulling inspiration from the hanging snowflakes above the fireplace. I die-cut a labels 10 from Spellbinders and used a coordinating frame from Waltzingmouse Stamps. Using Kraft ink, I stamped the Medium Curly Christmas Tree from DeNami Designs in the center of the frame and a sentiment from Waltzingmouse Stamps in red ink.  A white pearl was added to each end of the frame. The label was then layered on a doily cut from Lunch Bag Kraft Paper.

A length of white seam binding was wrapped around the card front and tied in a fussy bow adding a button and some twine for a decorative touch. 

Here is the beautiful inspiration photo to get those creative juices flowing. 

TRR#43
Be sure to head over to The Ribbon Reel to be inspired by the other design team girls.  The challenge runs bi-weekly so you have two weeks to participate and show us your beautiful creations. The more times you enter the more chances you have at winning some 
free goodies from The Ribbon Reel!

Further inspiration was found and I would also like to join in at:
City Crafter Challenge: Photo Inspiration Use colors in photo
Sweet Stampin' - Dies and Punches

Simon Says Stamp - Snowflakes
Unscripted Sketches


DeNami Designs Pretty Packaging Blog Hop

Hi There!
It's DeNami Blog Hop Time!!!
You should have arrived from
   Tina's blog
but if you just hopped in you don't want to miss
all the wonderful inspiration so
you will want to start at the
DeNami Designs Blogplus you don't
want to miss out on your chance to win
a mini DeNami Shopping Spree!
2 very lucky commenters will win
$20.00 gift certificates !!
Here is what I have for you today!
I had so much fun decorating this little Kraft CD pocket 
filled with some yummy pouches of Hot Chocolate.
First I covered the CD sleeve with two 
different patterned papers in my stash. 
Next I added a doily to the center as a backdrop for
 my super duper cute Denami Designs Large Stocking
which has been paper pieced. I added a Christmas
Tree embellishment in the center of the stocking.
I then created a banner to stamp 
my Holiday Cheer sentiment using a 
Memo pin to add inside the stocking. 
A row of hearts were die-cut and added to
the top for a decorative touch.
I finished off with a fussy seam binding bow and some
Sand Buttons from DeNami Designs.
 Before I send you off to Emily's blog, remember you
have till December 10, 2012 at 11:59 PM PST
to comment on all the blog hop
participants.   Remember there
are some awesome DeNami gift certificates up
for grabs! Lots of wonderful inspiration
to feast your eyes on! 
I hope you enjoyed my packaging today! I sure
loved designing it! 
~Tammy~

Friday, December 7, 2012

Celebrate Celebrate Celebrate Celebrate


Hello~

I have a super quick post today! We have a birthday party to go to for our sweet neighbor who is turning 3. So I made a simple little card from our family to stick in with his gift! 

Hope you enjoy!
I started with adding lots of layers to showcase my sweet little Polka Dot Elephant by DeNami Designs centered inside the Celebrate Circle also by DeNami Designs.  The fun papers are from Cosmo Cricket Snorkel Line which have been layered on a cork sheet for added visual interest and texture. (Not that a three year old really cares...it's the designer in me) :-)
I am going to join in the fun with DeNami Designs Theme Challenge - Celebrate
Pretty simple card, but it's for a 3 year old who I am sure may never actually look at the card. Ha! I am also keeping pretty busy these days as I am sure most of you are and can appreciate time is limited. 
I hope you have a great Friday and start to your weekend! Any big plans or shopping on the agenda?
~Tammy~

Wednesday, December 5, 2012

Special Guest at the 10 Minute Craft Dash

Good Morning!

I had the honor of being asked by Paulina Nakamura to be a Special Designer for her 10 Minute Craft Dash Challenge that she host on her blog Pretty Pink Posh.  I delightfully accepted as I love this challenge, but I also let her know her challenge scares me. :-) Most of you know I have professed how SLOW I am when it comes to crafting. I love this challenge because it CHALLENGES me. Which is what a challenge is suppose to do!

Paulina wanted to make the 10 minute Craft Dash in December EXTRA special. She has asked some very TALENTED ladies to join in the fun!  If you didn't see the sneak on her blog yesterday, then you can find the list and links to their blogs below!

So here is the new color palette for the new Craft Dash:


I will show you my card first and the talk about the process! :-)


Note you can pull out your supplies before you start as I have done here!  It's a good idea to have in mind what you want to do before you start the timer.  

Wreath stamp - Inkadinkado 
Sentiment Stamp - DeNami Designs

And my final timer! Can we say EEK! 
I stamped my wreath on a white panel in stick candy green.  I stamped the wreath again in real red to fussy cut the bow.  I then added twine to look as if it was hanging. All little touches that take a little extra time, but could be omitted. I added my rhinestones last as I kept one eye on my timer! *wink*

Time to complete: 9 minutes and 54 seconds
So don't let the 10 Minute Craft Dash scare you - You can gather your supplies first! :-)))) Paulina has a helpful Tips & Tricks page you may want to check out.

The Challenge runs from December 5th 6:00 a.m.  PST till December 15th 11:59 p.m. PST.

Be sure to check out the details for the 10 Minute Craft Dash on Paulina's Blog.  There is a HUGE and fabulous prize up for the winner. She has been collecting and working on this for weeks. :-)

Now for those very talented ladies participating, you may want to check out their work.  I am always curious how others create with the tight timeframe.
Amber Kemp-Gertselhttp://www.damasklove.com
Ashley Cannon Newellhttp://ashleynewell.com/blog/
Britta Swiderskihttp://brittaswiderski.com/
Sarah Martina Parkerhttp://sarahmartina.com/
Tammy Hobbshttp://somewhereunderthesune.blogspot.com/ (that's me)

Thanks for stopping by and I hope you take on the 10 Minute Craft Dash!
Blessings!
~Tammy~

Monday, December 3, 2012

Hey Dude - The Kraft Journal Clean and Simple Challenge

Today starts a new challenge at The Kraft Journal, It's a busy time of year, so we thought a CAS challenge would be great! 

 I created a quick and simple boy card perfect for a hey how are ya, or just add a birthday sentiment inside. I created this card for my son's friend in mind. His birthday falls right after Christmas.

I started with a base of Lunch Bag Kraft and added some fun washi tape to the bottom of her card. A length of green baker's twine was added to the right side of the card front and tied in a bow at the top.  A rectangle focal panel from Lunch Bag Kraft was cut and mounted with foam tape. The focal panel was then decorated by adding images from Paper Smooches Little Fella such as the skateboard which was stamped over a length of  green washi tape.  The funny little skater dude was stamped and paper pieced using a subtle plaid patterned paper and added to his skateboard.  The final finishing touch was to add the sentiment.  CAS with plenty of "kraft" space showing. :-)

I hope you will play along with our Clean and Simple challenge this week at The Kraft Journal.  All those that participate in our challenges for the month will have a chance to win a $15.00 gift certificate from The Kraft Outlet....and you also get a chance to be considered for The Feature Me Friday artist post on The Kraft Journal blog!

I hope you have a blessed week!
~Tammy~

Saturday, December 1, 2012

December Cupcake Craftroom - Anything Goes at Christmas

Welcome to December's Cupcake Crafroom monthly challenge! With the busy Holiday's approaching we thought we would make the challenge stress free with a theme of Anything Goes at Christmas.  Mandy's new paper line Boutique Christmas is so fun and comes with a sentiment sampler. 

Here is what I have for you using some of the papers from the new line.

I enjoyed using all the fun papers in this line.  You can check it out here. The sentiment is one of 6 that comes on a sheet. The whimsical Christmas tree comes from Hero Arts Snowman set. For a bit of fun and flair, I added some stickles to some of the stars.

A length of white seam binding was added to the middle and tied into a fussy bow embellished with a button and some jingle bells.

Beautifully coordinated papers makes designing a cinch. 

I hope you will play along with us at The Cupcake Craftroom and be sure to check out this fun new line called Boutique Christmas.

We look forward to seeing what you create! You have all month to link up your projects.
Thanks for visiting me today!
~Tammy~

Thursday, November 29, 2012

10 Minute Craft Dash - Holiday Cheer and some EXCITING NEWS!

Hello there!

**Woohoo this was a 10 Minute Craft Dash Favorite on 12/4/12 Thanks for the shout out!**

I have some exciting news to share.....but you will have to wait till the bottom to find out! :-)


I am going to share my 10 Minute Craft Dash card first! Paulina has another fabulous color palette and the Sponsor is DeNami Designs! Woot Woot!
I started by gathering my supplies first!
And then the mad craft dash began.

I started with a 5 x 5 card base using navy blue cardstock. I layered a C-Flute Corrugated Kraft Paper onto my base. I had this on my desk leftover from another project.  I then cut a piece of white cardstock to size to stamp my Pine Wreath from DeNami Designs.  Next I added a sentiment from DeNami Designs Holiday Greeting Set to the center of the pine wreath. The finishing touches were to add glitz and glam. Noting I had time to spare, I added some snowflakes for added shimmer!
Final time to complete: 9 Minutes and 2 seconds
It's a wonder every time how I make it under 10 because I am slow as can be but this challenge sure lights a fire under me! :-))) Just no fussy bows and all the layering I usually do.
Won't you join the fun! There's still time!

I also would like to join the fabulous challenge at Paper Issues - Happy Holidays, Stampin' For Pleasure - Final Rudolph Day Challenge

NOW FOR MY NEWS!!!!!!
The Ribbon Reel 
 I have been asked to join the fabulous and talented Design Team at The Ribbon Reel! You can read the announcement here. What girl doesn't love to play with pretty ribbon and embellishments! 

Thank you for popping in and visiting! I appreciate you letting me share my joyous news too!  
~Tammy~

Wednesday, November 28, 2012

The Kraft Journal - Lunch Bag Kraft Paper Christmas Tree Tutorial

I have a fun little project for The Kraft Journal to share making your very own paper Christmas Trees from Lunch Bag Kraft.

The supplies you need include:
Lunch Bag Kraft cardstock.
* Wooden Bobbin
* Dowel Rod
* Stamps to decorate
* Glitter
* Embellishments

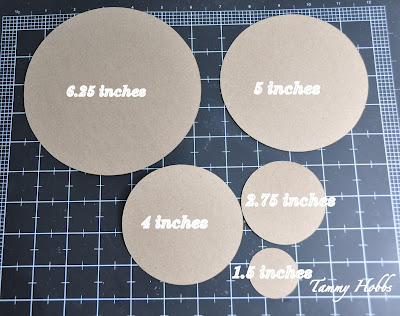
To start, you will need to cut some circles from Lunch Bag Kraft cardstock in the following sizes.
  • 6.25 inches
  • 5 inches
  • 4 inches
  • 2.75 inches
  • 1.5 inches

I used my Cricut, but you can utilize those resources in your house such as trace around bowls and cups. 
At this point, I stamped my circles randomly with some snowflake Images from DeNami Designs for a decorative touch.

Next I folded my circle in half.
Fold in Half Again.
And Again!
And one more time! :-)
Next you will need to snip the tip off.
The Next step (not pictured...lost my photographer) is to now open up your folded circles and fold accordion style.  

You will now repeat the process for the other circles.
Next you will place your dowel rod into your wooden bobbin and stack the folded circles.  For a touch of glitz, you may want to add a touch of glitter to the edges before stacking them.

Nottinghill Seam binding was added to the top; tied off in a fussy bow embellished with some jingle bells. 
A star was die-cut from C-Flute Corrugated Kraft Cardstock and painted for a shabby vintage look. 

Here's the finished tree. Fun and cute and easy to make. 

Be sure to stop by The Kraft Outlet to check out the wonderful line of Kraft Paper products! I would love it if you dropped by The Kraft Journal and left me some love! 

I am also joining in at Paper Issues - Happy Holidays, and thanks to Benzi...Little Red Wagon - Trim the Tree!

~Tammy~