Tuesday, December 31, 2013

Forever and for all eternity

Happy last day of 2013! Wow can you believe it?

I hope this finds everyone moving into 2014 healthy and happy and it will be a prosperous year for you!

I have a card to share today that features Paper Smooches Pretty Phases.  I got pretty girly with this card. I started with a Buff Ivory card base onto which I added a piece of Graphic 45 designer paper that has had the edges distressed. I added the sentiment Forever and for all eternity onto a subtle polka dot print paper in chocolate ink and added to the lower portion of the card front. 
At the top of the card, I cut a doily in half and inked and distressed it for a vintage touch followed by layering a die-cut doily border. I spritzed a chipboard embossed frame with Heidi Swapp Mistables and added to the center of the card. Next I painted a dove with cream acrylic paint and added to the frame. I added a light sanding to both the frame and dove. 
Final finishing touches include adding a fussy seam binding bow that can be found at My Craft Spot and various flowers from my stash.

I am going to join in and share at Paper Smooches Sparks - Anything Goes.  
I am also joining in at:  Sunday {Fun}day - December Linky Party,  D.L. Art - Thankful Thursday, Word Art Wednesday - Anything Goes.

Again, have a wonderful New Year's Eve! I will be back tomorrow kicking off the New Year with the new Paper Sweeties Inspirational Challenge. 
Blessings!
~Tammy~

Monday, December 30, 2013

The Kraft Journal #152 Favorite Project of 2013

For this weeks challenge at The Kraft Journal "Favorite Project of 2013" I narrowed it down to my favorite, but thought I would share a few more I enjoyed making this year. I totally adore the products The Kraft Outlet carries.  It makes creating a snap!

I created the above project for a tutorial in February and it can be found here if you missed it.  I give you step by step directions on how to create this.

Below are a few others I enjoyed making this year.


A Teacher Appreciation card.
Original Post can be found here.
I teach you how to make the mini pom poms from twine you see above.


A Back to School card.
Original Post can be found here.


And Last, just recently posted, Holiday Gifts.
Original Post can be found here.

I hope you will come and play along by sharing your favorite project you made for The Kraft Journal in 2013.  All of our followers who participate in our challenges for the month of December have a chance to be featured in the "Feature me Friday" post as well as be entered to win a voucher for The Kraft Outlet.

So happy you stopped by for a visit today! I hope you have a great week a Happy New Year!
~Tammy~

Monday, December 23, 2013

Snowflakes and more Snowflakes

Happy Monday Morning to you!

How are your holiday preparations going?

If you are looking for The Kraft Journal post, I will be back with one next week. The Kraft Journal is taking a week off for the Christmas Holiday. However, I have a sweet little greeting to share with you this morning. I usually don't send many New Years Cards, but I thought I would share one I have made for you today. 

I started with a base of Medium Kraft Cardstock which I added a piece of embossed snowflake patterned paper to a panel of white embossed cardstock adding a length of pink ric rac trim in the center.
A layered tag was die-cut adding a Happy New Year sentiment. For the falling snow on the tag I used DeNami Design Small Dot Square in blue ink. A fussy bow was created embellished with an aqua button, and glittered bells. I die-cut a snowflake and I added some glitter for a touch of winter glitz. I took the Medium Brushed Snowflake and stamped it in Versa Fine Ink onto a circle cut from Medium Kraft Cardstock adding aqua embossing powder which was heat set. 

Inspiration for this card came from Curtain Call - Sweet Snowflakes.
I am also joining in at: Just B Creative - December Linky Party2 Creative Chicks - Christmas/Winter, Sunday {Fun}day - December Linky Party,  D.L. Art - Thankful Thursday, Word Art Wednesday - Anything Goes, Drunken Stampers - Embossing, Chocolate, Coffee, and Cards - Happy Holidays,  Die-cut Divas - Happy Holidays, Cupcake Inspiration - Photo Inspiration


I hope you have a Marvelous Monday!
~Tammy~

Thursday, December 19, 2013

Paper Smooches Sparks - Get Well

Hello Friends!

I have a Get Well card so share today. I needed one and out of the stash of cards I have, I did not have any that fit the bill of non-frilly, lacy, girly...basically I needed a DMC (Dreaded Man Card). :o)

I turned to my Paper Smooches Stamps because I adore the fun images and they would make anyone smile needing to get better. 

I love the sweet fox from Chilly Chums so I started with stamping, coloring and cutting the little guy out and adding him to a set of layered die-cut circles. I searched through my paper stash to see what I had that would compliment the little guy and wasn't too girly. I started with a Brown Kraft Cover Weight Cardstock onto which I added my stripped pattern paper from Glitz.  Two banners were cut and added to left side of the card front. Next I added my sweet little fox.
Finishing touches include adding my Get Well greeting from Sentiment Sampler, buttons, and ric rac trim at the bottom. 

I am going to share at Paper Smooches - Sparks Challenge anything goes.

also at: Just B Creative - December Linky Party, Sunday {Fun}day - December Linky Party,  D.L. Art - Thankful Thursday,Word Art Wednesday - Anything Goes.

Thanks for visiting me and have a great day!
~Tammy~

Wednesday, December 18, 2013

DeNami December Pin-spired

Hi Ya!

It's Team 2 from the DeNami Design Design Team to share another Pin-Spired project with you. I took a literal approach this month. I saw the picture and just knew what I wanted to do.

Here is my card:

Here is the Pin-spired photo:
I started with a white background embossing with the Fleur Di Lis folder. I added some pretty patterned papers, a doily, and a die-cut poinsettia to the card front. I created a tag and stamped the To: From sentiment on the front adding some white twine. I anchored the tag with a mini clothes pin to complete the look.  

There you have it...sweet and simple!

I hope you will visit my fellow design team partners in seeing how this photo inspired them. 

Pattie

I think I will share it a few places.  Just B Creative - December Linky Party, Sunday {Fun}day - December Linky Party,  D.L. Art - Thankful Thursday,Word Art Wednesday - Anything Goes.
Thanks for dropping by!
~Tammy~

Monday, December 16, 2013

The Kraft Journal #151 Something New

For today's Something New challenge, at The Kraft Journal, I got to thinking about the New Year and wanted to create Valentine's Day treats using the Kraft Truffle Boxes from The Kraft Outlet . This is a product new to me as I haven't worked with them before. It was nice to switch gears from Christmas for a bit!

The Kraft Truffle Boxes come flat which makes it easy to use a background stamp before assembling.  I used DeNami Teeny Heart Background stamp here.  I placed a Lindt Lindor treat inside each one, added a seam binding bow, heart buttons which I have laced with Red Baker's Twine. I used a Memo Pin in each to hold a banner created from Buff Ivory Cardstock. The sentiment is from DeNami Design Love Sentiment stamp set. 

Please be sure to head over to the The Kraft Journal to check out the projects by the other talented ladies.  We hope to see your something new creations in the gallery this week for your chance to be featured on our "Feature me Friday" post as well as be entered to win a $15.00 gift voucher from The Kraft Outlet store.


I think I will share it a few places.  Just B Creative - December Linky Party, Sunday {Fun}day - December Linky Party,  D.L. Art - Thankful Thursday, Little Scrap Pieces - Fun Friday Linky Party, Word Art Wednesday - Anything Goes.

Have a fabulous week! 
~Tammy~

Saturday, December 14, 2013

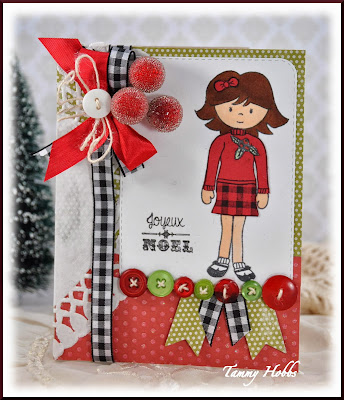
Joyeux Noel

Hi! 

I just wanted to share another quick post today! It's so hard to photograph cards sometimes. I don't think the pictures do the ribbon /embellishments justice. It's 100% a bulky card! :-) I seriously can't help it. 

So here it is! :-)))
I started by piecing together my pattern papers. The bottom layer is a glittery embossed red patterned paper. Also much prettier in person. I then added part of a heart doily to the left side of the card front.  Next I wrapped a length of gingham ribbon vertically around the card front and tied in a bow. I embellished with another red seam binding bow, twine, a button, and some winter berries in my stash. 
I stamped Abigail onto a stitched journaling card. I gave her an outfit from So Proud of You.  On her sweater I gave her a pin using Holly from Have a Holly Jolly Holiday.  A row of buttons laced with twine is the final embellishing touch. Finally, I added a sentiment from Season Of Love. All Stamps are from Paper Sweeties.

I will share this at: Word Art Wednesday - Anything Goes,  D.L. Art - Thankful Thursday, Scrapping Everyday Miracles - Christmas,  The Shabby Tea Room - Noel, Buttons and Polka Dots

I am sad this is their final challenge, but sharing at Papercraft Star: Christmas.

Well that wraps it up for me today!  Hope you have a wonderful Saturday!
Blessings!
~Tammy~

Friday, December 13, 2013

Christmas Wishes

Hi!

Just a quick post...I thought I would share a card I made that took longer than I had EVER intended. I needed a Christmas Card to be included with a gift. I thought it would be cute to "hang" my ornaments. Needless to say the whole process from paper piecing and lining up took way longer than it should have. I think I will go back to my multi-layer fussy bow cards now! Ha! 

Anywho...here is the not so quick extra card I needed! 
 The stamped images are from Paper Smooches - All Yule Need. I still had it out from last week, and that is what sparked my card today. We won't talk about the condition of the crafty space of late. Hence the reason why this set was still out. Ugh! Need more time in the day. Can I get a heck ya from anyone else? :-)))
I wanted to set my Brown Cover Weight Kraft panel off to the right. I was feeling a bit off today anyway...ha! Just kidding. I thought it would give some visual interest. Hung my ornaments with some very frustrating white twine that frays like...well this is a family friendly blog...*wink* Let's just say that is part of what was taking so long. I got it fixed right, and when I flipped it over to add adhesive then it frayed (AGAIN) as I pressed down I guess. This girl was not about to start over. Oh well, usually the recipients are tickled to receive something handmade! 

Well, I am going to end the madness now.

I hope you have a Fabulous Friday!  I think I will share it a few places.  Just B Creative - December Linky Party2 Creative Chicks - Christmas/Winter, Sunday {Fun}day - December Linky Party,  D.L. Art - Thankful Thursday, and I might throw it in at Paper Smooches Sparks Picture Perfect. (So not perfect on the account of colors, but hanging ornaments...right?)


~Tammy~

Thursday, December 12, 2013

Hot Chocolate Ornaments with DeNami Design!

Hello Friends!

It's my turn to share a project on the DeNami Blog today, and I thought I would share a few hot chocolate ornament sets I am working on. It's a sweet and inexpensive gift. We love hot chocolate in our house. Warm, Cozy, and ummmm yummy!

I created two different varieties and I created a sweet little tag for each using the Classic Christmas Stamp Set and sentiments from Christmas Greeting Stamp Set
I created little matching 3 x 3 cards with instructions on how to make the hot chocolate! I used the Large Ornament stamp on the front of the card. The images inside the ornament are from the Candies Stamp set.
These little ornaments and their cards fit perfectly inside the Gift Bag Template.   I dressed them up a bit with a fussy bow embellished with tinsel and DeNami Boutique Buttons. I kept the cards and gifts bags fairly simple for ease of multi-producing. 
 A sweet little inexpensive gift to share!

I am joining in at: 3 Girl Jam - Tis The Season w/Ribbon, Word Art Wednesday - Anything Goes, Just B Creative - December Linky Party2 Creative Chicks - Christmas/Winter, Sunday {Fun}day - December Linky Party, Craftin' Desert Divas - Christmas, D.L. Art - Thankful Thursday.

Thanks for joining me today! 
~Tammy~

Wednesday, December 11, 2013

DeNami Design Product Spotlight - Winter Wreath

Happy Wednesday Friends!

The DeNami Design Team is showcasing a brand new Product Spotlight today! Today's spotlight is the Winter Wreath and it is part of the latest release.  You can add this stamp to your card for a 10% savings one week only!

I used this beautiful stamp for a birthday card. I am sure we all have someone who might have a "wintery" birthday on our list.

DeNami Products used:
I started by adding some pieced patterned papers to my white card base. I stamped the wreath on a die-cut panel and inked the edges. I added berries from the Classic Christmas Stamp Set. I created a fussy bow and embellished with a decorated sentiment tag, button, and twine bow. In the center of the wreath I added a layered heart top with a yellow button from the  Pastel Boutique Buttons collection.

It's always fun to see what the rest of the Design Team created using this same stamp. You will not be disappointed. 

Monday, December 9, 2013

The Kraft Journal #150 - Holiday Gifts - Cinnamon Honey Butter

Good Monday Morning To You!

For today's Holiday Gifts challenge at The Kraft Journal, I made homemade Cinnamon Honey Butter and placed in decorated mason jars to be delivered in Kraft Bags that have been decorated with a vintage touch 

I used lots of products from The Kraft Outlet today. I started by decorating a Medium Kraft Paper Sack by die-cutting doilies from Buff Ivory Cardstock and distressing it with water and distress inks. The water will break down the fibers and give it a worn  and vintage look.  I used Medium Kraft Cardstock to die-cut Christmas Trees by Sizzix adding stickles for a decorative glitzy touch. I stamped and added a Grungy Prim Hang tag using an image and sentiment from Paper Sweeties Season of Love.  I used a Hinge Clip which has been painted cream to add the tag and keep the bag closed. 

I created a paper flower using Vintage Dictionary Pages and Brown Kraft Text Paper using a technique I shared in January and can be found here.
For the Jars, I printed tags using Medium Kraft Cardstock and embellished with ribbon, a berry sprig, a button and Red Baker's Twine. I also added some christmas material to the top cutting out using pinking shears. 
Aren't they cute! And yes the contents is very sweet and yummy!
Please be sure to head over to the The Kraft Journal to check out the projects by the other talented ladies.  We hope to see your Holiday Gifts creations in the gallery this week for your chance to be featured on our "Feature me Friday" post as well as be entered to win a $15.00 gift voucher from The Kraft Outlet store.

I am joining in at Paper Issues - Christmas, 3 Girl Jam - Tis The Season w/Ribbon, Word Art Wednesday - Anything Goes, Just B Creative - December Linky Party, Curtain Call Countdown to Christmas2 Creative Chicks - Christmas/Winter, My Craft Spot - Christmas Neighbor Gift, Sunday {Fun}day - December Linky Party, Craftin' Desert Divas - Christmas

Have a fabulous week! 
~Tammy~

Sunday, December 8, 2013

DeNami Design December Blog Hop - Razzle Dazzle

Hi and Welcome to the DeNami Design Razzle Dazzle Blog Hop! I hope this finds you all enjoying your weekend during this busy time of year. We are awaiting our first snow "storm", but usually it's very little or nothing. One thing is for sure…it's cold! We had nearly 70 degree weather earlier this week and today is not suppose to get over 30. CRAZY! Enough small talk….on to why you are here!

You should have arrived from Tina's blog, but if you are just wondering in or get lost along the way, you can head over to the DeNami Design blog to get the complete list of participants.  If you are new to the blog hops, today's hop is full of inspiration using DeNami Design Products themed around A Little Razzle and Dazzle! :-)))

ALSO, you will want to comment along the way for your chance to win one of the 2 shopping sprees DeNami is giving away
So let's get started with my card:
I used lots of DeNami goodness today, so I am going to list here for easy access!
I started with a green card base onto which I pieced my patterned paper (which has some razzle dazzle to it) to a sheet of white cardstock. I then stamped the tree from the Winter Fun Stamp Set using an embossing pad adding Gold Embossing Powder and set it with my heat gun. I then added Red Graph Washi Tape just above the embossed trees and added a snowflake metallic trim across the length of the card. 

I stamped, cut, and paper pieced the Large Stocking adding Misty Blue Glitter to the toes, heals and cuff!  I placed the stocking on a gingham bracket die-cut and added to the center of my card. I stamped a sentiment from Holiday Greeting Stamp Set and placed on a banner adding to the center of the stocking. Final finishing touches included adding a few Red Rhinestones to the top of the card and creating a fussy seam binding bow embellished with some tensile, red jingle bells, and a Emerald Green Boutique Button.  
Before I send you off to the next designer Jennifer, remember you have until December 9th, 2013 at 11:59 PST to comment on all the blog hop participants. There are some awesome DeNami Designs Gift Certificates for the taking!  You could be the lucky winner of one of them!

I am sharing at Paper Issues - Christmas, Just B Creative - December Linky Party, Curtain Call Countdown to Christmas2 Creative Chicks - Christmas/Winter, Sunday {Fun}day - December Linky Party, Scrapping Everyday Miracles - Christmas Theme, 3 Girl JAM - This the season with Ribbon.

Hope you have a Terrific Sunday!
~Tammy~

Saturday, December 7, 2013

Making a Flat Card Take Two- Swanky Snow Globe Card!

Hi~

** Woohoo! This card was selected as a Featured Designer for the Paper Smooches Sparks Challenge on 12/9/13 **

If you saw my post yesterday, then you will understand the post today! :-) I had every intention of making a flat card for a certain mailing...in my design process, I just couldn't finish the card without a bow and a double one at that. So, I am back today with my 2nd attempt to make a flat card.  I decided to make another snow globe card. In doing this, I knew I would be able to make a card with NO BOW! :-) However, I did add some foam tape, so technically I think I failed, but enough to pass the mailing inspection. :-)

So here it is!
I started with a Snow Globe File and made it into a card. I stamped my sentiment from Paper Smooches: Chilly Chums. Next I built the globe scene using images from Chilly Chums and Swanky Snowdudes
So what do you think??? Did I pass the "flat" test??? Simple, but pretty cute. I am partial to snowglobes and sweet snowmen! 

I am going to join in again at Paper Smooches Sparks - Anything Goes, Paper Issues - Christmas, Just B Creative - December Linky Party, Curtain Call Countdown to Christmas2 Creative Chicks - Christmas/Winter, Sunday {Fun}day - December Linky Party, Scrapping Everyday Miracles - Christmas Theme.

I hope you have a wonderful weekend!
~Tammy~