
I have a fun little project for The Kraft Journal to share making your very own paper Christmas Trees from Lunch Bag Kraft.
The supplies you need include:
* Lunch Bag Kraft cardstock.
* Wooden Bobbin
* Dowel Rod
* Stamps to decorate
* Glitter
* Embellishments
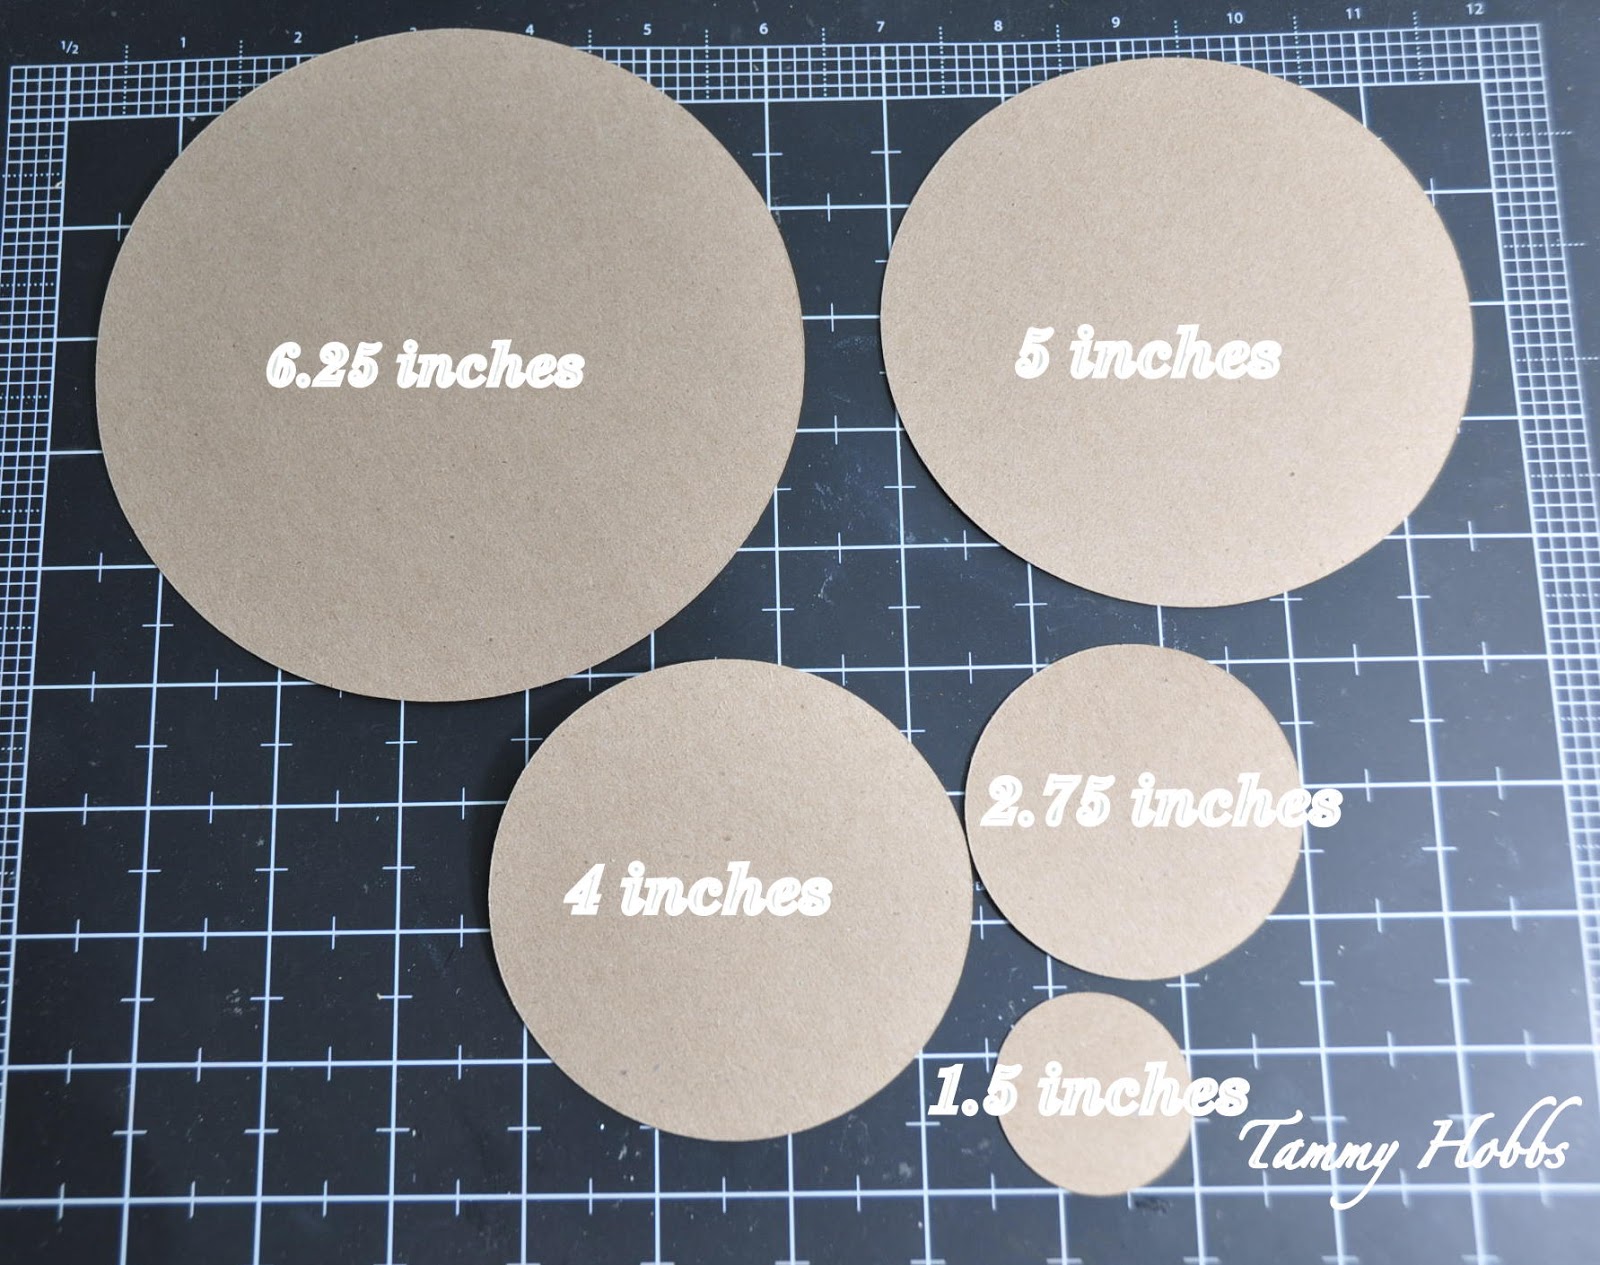
To start, you will need to cut some circles from Lunch Bag Kraft cardstock in the following sizes.
- 6.25 inches
- 5 inches
- 4 inches
- 2.75 inches
- 1.5 inches
I used my Cricut, but you can utilize those resources in your house such as trace around bowls and cups.
At this point, I stamped my circles randomly with some snowflake Images from DeNami Designs for a decorative touch.
Next I folded my circle in half.

Fold in Half Again.

And Again!

And one more time! :-)

Next you will need to snip the tip off.

The Next step (not pictured...lost my photographer) is to now open up your folded circles and fold accordion style.
You will now repeat the process for the other circles.

Next you will place your dowel rod into your wooden bobbin and stack the folded circles. For a touch of glitz, you may want to add a touch of glitter to the edges before stacking them.

Nottinghill Seam binding was added to the top; tied off in a fussy bow embellished with some jingle bells.

A star was die-cut from C-Flute Corrugated Kraft Cardstock and painted for a shabby vintage look.
Here's the finished tree. Fun and cute and easy to make.

Be sure to stop by The Kraft Outlet to check out the wonderful line of Kraft Paper products! I would love it if you dropped by The Kraft Journal and left me some love!
I am also joining in at Paper Issues - Happy Holidays, and thanks to Benzi...Little Red Wagon - Trim the Tree!
~Tammy~

26 comments:
this is soooo fantastic- thanks so much for the tutorial! i think i might make a couple for my kitchen table! tfs!!
This is just gorgeous Tammy they would look great on a Christmas Dinner table for each guest! Susan x
OMYGOSH!!! This is sooooooooooooo cute cute cute!!!!!!! WOW!!! I love it!! Off to Pin this!!!
Tammy, this is a fabulous tree and a great tutorial. I love the little star and all the wonderful glitter. What a great job with the accordion style.
I just saw that the challenge at Little Red Wagon is Christmas trees if you want to check it out and enter.
What a cute tree and great tutorial!
Thanks for joining us at LRW!!
This is soooo stinkin' cute, Tammy! I totally want to make one of these! Thanks for the awesome tutorial!
Super cute tree! Thanks for the tutorial!
Tammy, this is fabulous and SO creative!!! I gotta give this a try...so fun and such a fun statement on a table:) LOVE this!!!
Hope your having a wonderful day!
Sherrie K
http://sherriescraps.blogspot.com
Oh wow how sweet is this! Super easy tutorial as well! Tks. for sharing!
How fun is this?! TFS, Tammy!
oh my word how totally adorable...Such a fun fun design..thanks for sharing..I must try this... I LOVE IT
Annette stole those words right out of my mouth... LOL! They are darn the cutest Tammy and you know what they sure would make great center pieces for company party's or any Christmas gathering going on..... So talented - will have to try on some scraps.....
TFS~
This tutorial is so perfect! Love that tree with the fun snowflake pattern!
This is absolutely gorgeous, Tammy!! I love the look!! And thanks for the tutorial...I definitely have to try this!! Awesome as always my creative friend!! Have a great day :)
Lisa
A Mermaid's Crafts
This is seriously good!!! Love your tree! Thanks for tutorial. Nicola x
These are just gorgeous, and thanks for the tut!
Caroline xxx
This is FABULOUS, Tammy, thanks so much for doing the tutorial (gonna PIN this one for sure!)
You are so talented, Tammy! Thank you so much for the tutorial - I think I'm going to make these for my co-workers!
FABULOUS!!!!! This turned out so pretty Tammy!!! Wow, what a great tutorial, may have to try thiS. I know it certainly won't turn out as lovely as this! You rocked this project! Thanks for the inspiration!
Sherrie K
http://sherriescraps.blogspot.com
Oh my total cuteness! Such a clever little project, and it looks great in kraft.
SO AWESOME! I love the dimension, and that little corrugated star at the top - and those bells! Gah. How awesome would this be as a little centrepiece? Love your perfectly simple tutorial, too - you make me think I could easily do it too :)
Very clever, thanks for the tutorial.
Love this adorable Christmas Tree, thanks for the tutorial
This couldn't be any sweeter, Tammy! I adore this little tree -- and especially love that it's created with Kraft and that yummy corrugated star on top - LOVE!!!
What a fun tree, Tammy! Thanks for sharing the instructions!
awesome, love clever and this very clever and cute!!!
Post a Comment